
Crochet Flower - Tutorial

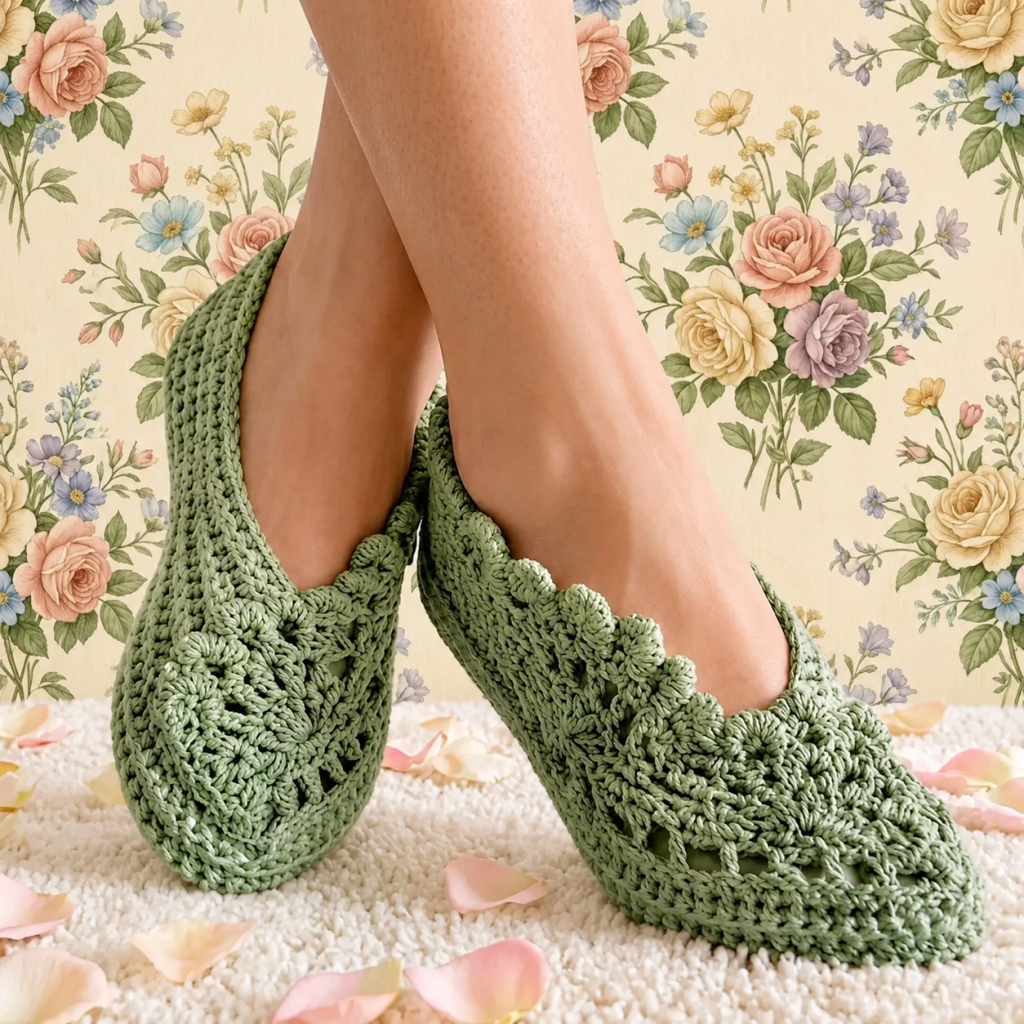
When the chilly drafts start sliding across your floors, nothing beats slipping your feet into a pair of lightweight crochet slippers, and following a comprehensive tutorial is the absolute best way to create your own custom pair. Crafting your own footwear is not just an incredibly rewarding project; it also allows you to select the exact yarn textures and colors that match your personal style and comfort needs. Whether you are a seasoned pro or someone who just picked up a hook, making handmade slippers is a fantastic project that yields highly practical results for everyday wear around the house.
Choosing to make lightweight crochet slippers ensures that your feet stay comfortably warm without feeling overheated or weighed down during transitional seasons like spring and autumn. This specific tutorial focuses on a design that balances breathability with coziness, making it an ideal choice for lounging on weekends or working from a home office. By understanding the fundamentals of stitch construction and yarn choice, you will be able to whip up several pairs of these cozy essentials for yourself, your friends, or your family members in no time.
In this detailed lightweight crochet slippers tutorial, we will walk you through every single step of the process, ensuring you master the techniques required for a flawless finish. From selecting the perfect lightweight yarn to shaping the sole and the upper toe box, this guide is optimized to give you a smooth, stress-free crafting experience. Grab your favorite crochet hook, find a comfortable seat with good lighting, and let us dive into the wonderful world of handmade footwear that your feet will thank you for.
The foundation of any successful crochet project lies in selecting the right materials, especially when you are aiming for a breathable and durable result. For a lightweight crochet slippers tutorial, you want to steer clear of bulky, heavy wools that cause sweating and instead opt for sport weight or double knitting yarn blends. Cotton, bamboo, and lightweight acrylic blends are phenomenal choices because they offer excellent structure while remaining remarkably soft and breathable against bare skin.
In addition to your yarn, selecting the correct crochet hook size is paramount to achieving the perfect tension for wearable footwear. A hook that is slightly smaller than what the yarn label recommends can help create tighter, more cohesive stitches that prevent your toes from poking through. For this lightweight crochet slippers tutorial, a 3.5mm or 4.0mm hook usually provides the ideal balance of flexibility and density needed to keep the slippers form-fitting.
Do not forget to gather your essential notions before you begin stitching your brand new footwear project. You will need a couple of stitch markers to keep track of your increases, a sharp pair of scissors, and a sturdy yarn needle for weaving in those loose ends cleanly. Having these tools organized and ready at your workspace ensures an uninterrupted, relaxing flow as you transform your yarn into beautiful lightweight crochet slippers.
When considering longevity, look for yarns that have a small percentage of nylon blended into the fibers for added strength. Since slippers endure constant friction against flooring, a reinforced lightweight yarn prevents premature wear and tear on the heels and toes. This small consideration during your material selection phase will ensure that your finished project lasts for many seasons of comfortable indoor walking.
Proper tool selection also directly impacts the overall drape and size accuracy of your finished handmade footwear. If your stitches tend to be loose, switching to a smaller hook will help you maintain a snug fit that hugs your feet perfectly without slipping off your heels. Taking a few minutes to test your gauge before diving into the main pattern is a highly recommended practice for any crochet enthusiast.
Ultimately, the beauty of a DIY lightweight crochet slippers tutorial is the absolute freedom to customize the colors and textures to your exact liking. You can choose subtle neutral tones for a minimalist aesthetic, or vibrant self-striping yarns to inject a burst of joyful color into your daily loungewear routine. Once your materials are curated, you are fully prepared to take the next step toward handcrafting ultimate comfort.
Before we begin shaping our footwear, we must master the core stitches that give these lightweight crochet slippers their unique flexibility and structure. This tutorial primarily utilizes fundamental stitches such as the chain stitch, single crochet, and half double crochet to build a solid fabric foundation. Utilizing half double crochet stitches allows the project to grow quickly while maintaining a dense enough texture to protect your feet from cold surfaces.
Establishing the correct gauge is the secret weapon to ensuring your finished project actually fits your unique feet seamlessly. Gauge refers to the number of stitches and rows per inch, which determines the final dimensions of your crocheted item. If your gauge matches the guidelines in this lightweight crochet slippers tutorial, your slippers will turn out exactly the right size instead of being too tight or overly loose.
To practice your tension, crochet a small square swatch using the exact yarn and hook you intend to use for the final project. Count your stitches across a four-inch area to see if your tension aligns with standard measurements for lightweight footwear designs. If your swatch is too small, try using a larger hook; if it is too large, drop down a hook size to fix the issue.
Understanding how to work into the back loops only is another fantastic technique featured within this comprehensive lightweight crochet slippers tutorial. Working into the back loops creates a ribbed, stretchy texture that mimics the elasticity of knitted fabric, allowing the slipper to stretch comfortably over your heel. This simple stitch manipulation adds both aesthetic appeal and structural utility to your homemade footwear design.
Consistent stitch counting is highly critical when working on pairs of items like shoes, mittens, or socks. You want both of your completed lightweight crochet slippers to be identical in length, width, and overall shape for a balanced walking experience. Using stitch markers at the beginning of each row helps prevent accidental stitch drops or additions that can skew your final results.
As you become comfortable with the stitch rhythm, you will find that this pattern becomes incredibly meditative and relaxing to execute. The repetitive nature of the single and half double crochet stitches allows you to unwind while simultaneously creating something practical. With your stitches practiced and your gauge verified, you are ready to begin the exciting process of shaping your custom footwear.
The journey of building your lightweight crochet slippers begins at the very bottom with the construction of a comfortable, flat sole. In this section of our tutorial, we start by making a central chain that runs the length of your foot, minus the width of your toes. You will then work completely around both sides of this base chain in continuous ovals to create a sturdy, elongated oval shape that matches your foot outline.
To ensure the sole contours naturally to the human foot, we strategically place increases at the heel and the toe areas during the early rounds. By putting multiple stitches into a single space at the turning points, the fabric expands flatly without curling upward prematurely. This careful stitch distribution provides a smooth, comfortable foundation that sits perfectly flat against the floor as you walk around.
Once the sole reaches the desired width of your foot, it is time to transition into building the upper sides of your footwear. To achieve this, you will work a round of stitches into the back posts or back loops only, which creates a clean structural ridge. This clever technique forces the crochet fabric to turn upward at a sharp ninety-degree angle, instantly forming the walls of your lightweight crochet slippers.
After building up the sides for a few rows, we begin the process of decreasing stitches across the front area to form the toe box. Decreasing involves joining two stitches together into one, which gradually tapers the fabric tightly over the top of your toes. This shaping phase is where your project truly begins to look like a real, wearable slipper rather than a flat piece of fabric.
As you follow along with this lightweight crochet slippers tutorial, remember to try the slipper on your foot periodically during the shaping process. Because everyone has a unique foot arch and toe shape, trying it on allows you to make minor adjustments to the row counts on the fly. If the toe area feels a bit too snug, simply remove a decrease row to customize the fit instantly.
Finally, we work around the opening of the ankle to create a clean, finished border that prevents the edges from stretching out over time. A simple round of slip stitches or reverse single crochet around the ankle opening gives the slipper a polished, professional look. Repeat these exact steps for the second slipper, and you will have a beautiful, matching set of custom indoor shoes.
An incredibly fun aspect of completing a lightweight crochet slippers tutorial is adding personal creative flourishes to make your project truly unique. You can easily embellish the toe area with a cute crocheted flower, a classic bow, or even minimalist wooden buttons for a modern aesthetic. If you prefer a sporty look, you can use a contrasting yarn color to work a vibrant border around the top cuff.
Beyond aesthetics, ensuring your safety while walking on smooth hardwood or tiled floors is a top priority for handmade footwear. Because yarn can naturally be quite slippery on polished surfaces, applying a non-slip backing to the soles is highly recommended. There are several simple, budget-friendly ways to add excellent grip to your completed lightweight crochet slippers without ruining their flexibility.
One popular method among craft communities is applying small dots or lines of clear puffy fabric paint directly onto the bottom of the sole. Once dry, this fabric paint creates a rubbery, durable grip that prevents slipping while remaining completely flexible and washable. This quick modification elevates your homemade project into a safe, secure piece of daily footwear for your entire family.
Alternatively, you can sew small patches of genuine suede, leather, or specialized non-slip grip fabric onto the heel and ball areas of the sole. This not only provides maximum traction but also adds an extra layer of protection against daily wear, significantly extending the lifespan of your slippers. Sewing these panels on gives your lightweight crochet slippers a premium, high-end boutique finish that looks amazing.
If you are gifting these slippers to elderly relatives or energetic toddlers, integrating these safety features within the tutorial process is especially crucial. It transforms a thoughtful, handmade gift into a highly practical and safe item that can be worn with complete confidence every day. Taking this extra step shows an incredible attention to detail that elevates the overall quality of your fiber arts work.
Now that your custom embellishments are attached and your safety grips are cured, your beautiful creations are officially ready to wear. Slide them onto your feet, enjoy the soft cushioning of your handmade stitches, and relish the incredible comfort of a project tailored specifically for you. You have successfully completed the core journey of crafting lightweight, stylish, and cozy crochet footwear.
The best yarn for making lightweight indoor footwear is a sport weight or double knitting (DK) blend containing cotton, bamboo, or a nylon-acrylic mix. Cotton and bamboo offer exceptional breathability and structural integrity, ensuring your feet stay comfortable without overheating. Adding a bit of nylon provides the necessary durability to withstand constant friction against floors.
To achieve a perfect fit, it is essential to check your gauge before starting and to measure the slipper against your actual foot as you work. This lightweight crochet slippers tutorial allows you to easily adjust sizes by adding or subtracting rows in the sole and toe sections. Remember that crochet fabric stretches slightly with wear, so a snug initial fit is usually ideal.
Yes, you can wash them, but the specific care instructions depend heavily on the fiber content of the yarn you selected. If you used cotton or synthetic acrylic blends, you can safely wash them on a gentle cycle inside a mesh laundry bag and lay them flat to dry. Avoid using a hot dryer, as this can distort the shape of your slippers and damage any applied non-slip grips.
You can easily make your slippers safe for slick floors by applying dots of silicone sealant, hot glue, or puffy fabric paint to the soles. Another excellent option is stitching durable suede or leather patches onto the bottom of the slippers. These methods provide fantastic traction on hardwood and tile floors while maintaining the cozy flexibility of the fabric.
Absolutely! This project is wonderfully beginner-friendly because it relies on fundamental stitches like the single crochet and half double crochet. The shaping techniques are straightforward, making it an excellent stepping-stone project for beginners looking to expand their skills into making wearable items. Following the step-by-step layout ensures a smooth learning curve.
In this comprehensive lightweight crochet slippers tutorial, we have explored everything from selecting breathable, durable yarns to mastering gauge and shaping a custom-fit sole. We also covered essential techniques for building up the sides, tapering the toe box smoothly, and adding critical non-slip safety features to protect your steps on smooth indoor surfaces.
By breaking down the process into manageable sections, you can easily create beautiful, comfortable footwear that perfectly matches your personal style and needs.


