
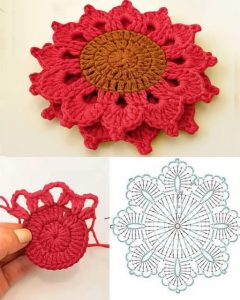
Crochet Flower - Tutorial

Crochet Rose – Tutorial: Creating beautiful, timeless floral pieces is one of the most rewarding skills you can develop in the fiber arts world. Whether you want to embellish a cozy blanket, add a touch of romance to a garment, or create an everlasting bouquet, learning how to craft a stunning handmade yarn flower is the perfect project. This comprehensive guide will walk you through every single step, ensuring that even beginners can master this gorgeous craft and produce professional-looking results.
The beauty of a crochet rose lies in its incredible versatility and the joy of creating something delicate from a simple strand of yarn. Crafters all over the world love this specific project because it combines basic stitches with unique assembly techniques to mimic the soft, layered petals of a real flower. In this detailed step-by-step crochet guide, you will discover the exact materials, stitches, and secrets needed to bring your digital or physical garden to life.
As you dive into this Crochet Rose – Tutorial, remember that patience and tension control are your best friends when shaping floral petals. By optimizing your stitch placement and choosing the right yarn textures, you can create various styles of roses, from tight, elegant buds to full, blooming garden roses. Let’s explore the essential components, detailed methods, and creative finishes that will make your crochet flower pattern a complete success.

Selecting the perfect materials is the first crucial step in ensuring your crochet rose tutorial yields a beautiful, structured flower. The weight and texture of your yarn directly impact the final size, definition, and overall realism of your crafted rose petals. For beginners, a medium-weight cotton or acrylic yarn is highly recommended because it offers excellent stitch visibility and holds its shape exceptionally well over time.
Cotton yarn is widely considered the gold standard for a 3D crochet flower because it provides a crisp structure that keeps the petals from drooping. If you prefer a softer, slightly fuzzy look for a vintage aesthetic, a high-quality premium acrylic yarn is an excellent, budget-friendly alternative. Avoid highly textured or variegated yarns for your first few attempts, as they can obscure the beautiful definition of your crochet stitches.
Your crochet hook choice should directly correspond to the yarn weight you select, but with a slight twist for floral projects. To ensure your crochet rose – tutorial results in firm, sturdy petals, consider using a hook that is half a millimeter smaller than what the yarn label recommends. This minor adjustment creates tighter stitches, preventing the stuffing or internal wire from showing through the gaps.
An ergonomic hook can also make a massive difference in your crafting comfort, especially when working the dense rows required for layered crochet petals. In addition to your primary hook and yarn, make sure to gather essential notions like sharp yarn needles, stitch markers, and sharp scissors. Having these tools organized beforehand allows you to maintain a smooth, uninterrupted creative flow throughout the entire project.
If you plan to turn your finished flower into a long-stemmed beauty, you will also need some floral wire and green floral tape. The wire provides the necessary internal support to keep your elegant crochet rose standing tall in a vase or arrangement. For a purely decorative applique, however, you can completely skip the wire and focus entirely on the textile work.
Ultimately, experimenting with different yarn fibers like bamboo or wool blends can yield fascinating variations in your handmade crochet bouquet. Don’t be afraid to mix and match colors, using subtle gradients or classic red, pink, and white tones to match your specific decor. The right foundation of materials ensures that your hard work translates into a durable, stunning piece of art.
Before rolling up your sleeves and diving into the main pattern, it is vital to familiarize yourself with the fundamental crochet stitch definitions used here. This specific Crochet Rose – Tutorial relies heavily on a combination of basic stitches arranged in a way that builds gradual height. By mastering the transition from short stitches to taller ones, you easily create the natural, curved slope of a real rose petal.
The foundation of your flower begins with a standard crochet chain stitch, which dictates the overall volume and ultimate size of your blossom. A longer initial chain will naturally result in a larger, more intricate flower with significantly more layers to roll up at the end. Ensuring your base chain is consistent and not too tight is a major secret to achieving a flexible, easy-to-assemble floral strip.
Next, the single crochet stitch is utilized to create a firm, stable edge and establish the initial spacing for your petals. This stitch provides the structural integrity needed at the base of the flower, ensuring it won’t unravel when you begin the assembly phase. It serves as the anchor point from which all your beautiful, sweeping petals will bloom outward.
To create the beautiful, rounded tops of the petals, you will frequently use the double crochet stitch and the half double crochet. These taller stitches allow you to rapidly build height in the center of each petal before tapering back down to the base. This specific volumetric rise and fall is what gives the crochet rose pattern its distinctive, romantic wave.
Advanced crafters might also incorporate the treble crochet stitch into the outermost rows to create expansive, fully opened petals. Utilizing different stitch heights within a single petal creates an authentic, organic look that mimics nature’s beautiful irregularities. Understanding how these stitches interact is the key to unlocking true realism in your fiber arts projects.
Practice maintaining an even tension as you transition between these different stitch heights across your foundation row. If your tension is too loose, the petals will look sloppy; if it is too tight, curling the rose will become frustratingly difficult. With a little practice, these essential crochet techniques will become second nature, paving the way for a flawless crafting experience.
Once you have successfully crocheted the long, wavy strip of petals, it is time to move on to the magical assembly phase. This part of the Crochet Rose – Tutorial is where your flat piece of crochet fabric miraculously transforms into a gorgeous three-dimensional blossom. Lay your completed strip flat on a clean surface with the right side of the stitches facing upward toward you.
Take the narrowest end of your stitch strip, which typically represents the center bud of your handmade yarn rose. Slowly and gently roll the strip inward, keeping the bottom edges completely aligned and flush with one another as you turn. Rolling tightly at the very beginning creates a realistic, closed center bud that opens up naturally as you roll outward.
As you continue rolling the fabric, allow the outer petals to become slightly looser to simulate a flower in full, gorgeous bloom. This shifting tension during the rolling process gives your 3D crochet rose a dynamic, lifelike appearance rather than a rigid, mechanical shape. Take your time during this step, adjusting the folds until you are completely satisfied with the visual balance.
Once the rose is fully rolled into shape, secure the structure immediately using a long tail of yarn and a sturdy yarn needle. Thread the needle and pass it horizontally completely through the base of the rolled layers, catching every single row to prevent slipping. Repeat this stitching process in a crosswise or star pattern across the bottom until the entire flower feels solid.
If you are adding a stem, insert your fabric-wrapped floral wire directly through the center base before completely tightening your sewing stitches. You can add a small dab of hot glue or fabric glue at the base connection point for an extra layer of structural security. Ensuring the stem is firmly anchored is vital if the crochet flower arrangement will be handled frequently.
Finally, gently use your fingers to fluff, shape, and sculpt the individual petals outward, giving them a natural, organic curve. This final blocking and shaping phase is often overlooked, but it is precisely what separates amateur projects from professional crochet boutique items. Your flower is now fully assembled and ready to be displayed proudly or gifted to someone special.
Now that you have completed this Crochet Rose – Tutorial, the creative possibilities for displaying your gorgeous artwork are virtually endless. One of the most popular trends in the crafting community is creating an everlasting crochet flower bouquet for special occasions. Unlike real flowers, these beautiful textile creations will never wilt, making them cherished keepsakes for weddings, anniversaries, or Mother’s Day.
You can easily adapt these individual blossoms into elegant, wearable fashion statements by attaching them to metal hair clips, headbands, or brooch pins. A single crochet rose applique sewn onto a plain denim jacket, a canvas tote bag, or a cozy winter hat instantly elevates the garment with personal charm. It is a fantastic, sustainable way to upcycle older clothing items and express your unique personal style.
For home decor enthusiasts, these handmade flowers look absolutely breathtaking when arranged neatly inside a rustic wooden box or a delicate glass vase. You can also sew multiple roses onto a round foam base to create a stunning, colorful crochet floral wreath for your front door. This adds a warm, inviting, and handmade touch to your living space that guests will instantly admire.
Another wonderful idea is utilizing these delicate textile pieces as unique, reusable embellishments for high-end gift wrapping and holiday packages. Instead of a standard plastic bow, tie a beautiful handmade crochet rose onto the ribbon of a gift for a loved one. It adds an extra layer of thoughtfulness, showing the recipient that you truly invested your time into their present.
If you enjoy digital content creation or run a craft blog, these finished items make incredible, eye-catching photography props. Sharing your journey and finished products on social media platforms is a fantastic way to connect with the global crochet community. Your beautiful creations can inspire beginners around the world to pick up a hook and start learning.
Ultimately, mastering this project allows you to spread joy through the beautiful, meditative art of fiber crafting. Whether you keep them for yourself, sell them in an online shop, or donate them to local community centers, your roses carry a wonderful story. Keep experimenting with scales, sizes, and colors to expand your creative horizons even further.
For beginners tackling this Crochet Rose – Tutorial, a medium worsted weight (Category 4) yarn is highly recommended. It provides excellent stitch definition, is easy to hold, and works up quickly without straining your eyes or hands. Cotton yarn is ideal for structural stiffness, while premium acrylic offers a softer, budget-friendly experience.
An intermediate crafter can easily complete a single flower, including assembly, in about 30 to 45 minutes. For beginners, it might take roughly an hour as you get used to the petal stitch transitions and the rolling technique. Once you memorize the basic rhythm of the pattern, your production speed will naturally increase.
Yes, you can absolutely wash them, but the specific method depends entirely on the fiber used and if wire was included. If you used pure acrylic or cotton without any internal wire, you can gently hand wash them in cool water with mild soap and air dry. For wired stems, it is best to use a hair dryer on a cool setting to gently blow away any accumulated dust.
The secret to a secure blossom is passing your yarn needle entirely through all the rolled layers at the base during assembly. Do not just sew the outer edges; instead, guide your needle completely through the center core from multiple angles. Using a long, strong tail of matching yarn ensures the stitches remain completely invisible while providing maximum security.
Yes, this project is incredibly beginner-friendly because it uses fundamental stitches like the chain, single crochet, and double crochet. The pattern is worked in a straight, flat row rather than working in a complex continuous round, which eliminates the need for advanced magic ring techniques. It is an excellent confidence booster for someone new to the craft.
This Crochet Rose – Tutorial provides a comprehensive, accessible path to mastering one of the most beloved designs in the entire fiber arts world. Throughout this guide, we have explored everything from selecting structural cotton yarns to executing seamless stitch transitions that mimic real garden petals.
You also learned the vital art of rolling and securing your flower base, ensuring your beautiful creation remains structurally sound for years to come. By combining these classic techniques, you can confidently produce stunning, timeless floral accents for any creative project.


