
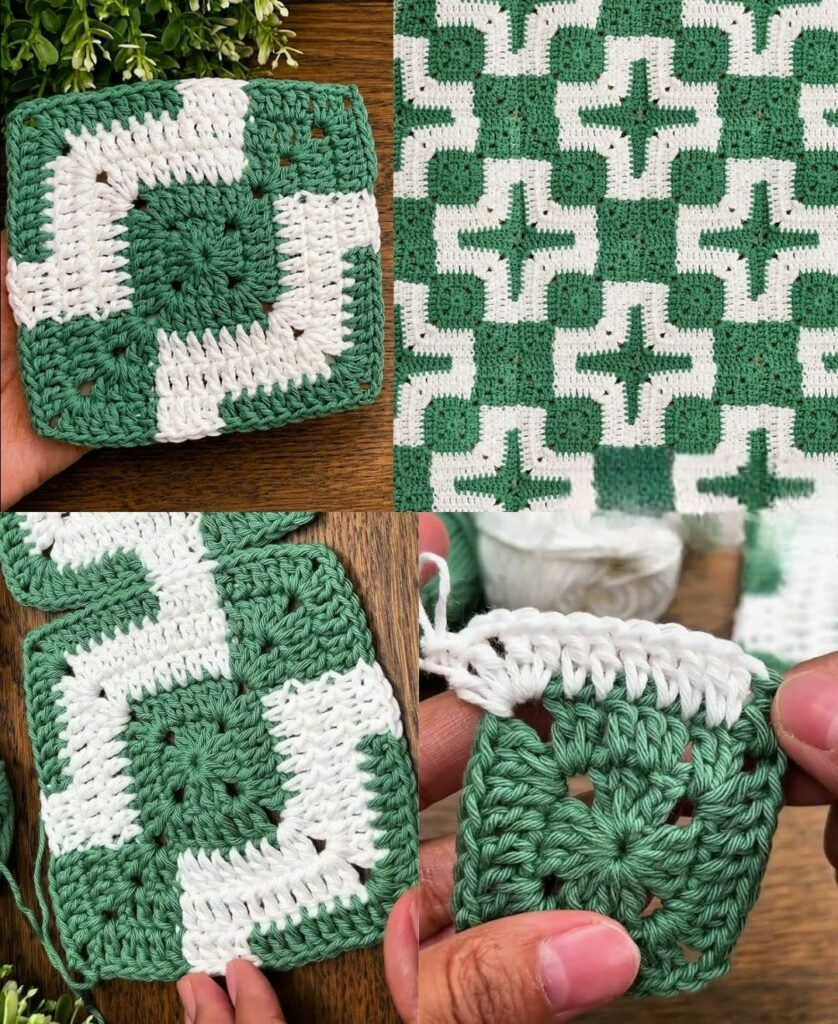
Crochet Flower - Tutorial

Crochet Square – Tutorial is the ultimate starting point for anyone looking to dive into the beautiful world of yarn crafts. Whether you are holding a hook for the very first time or you are a seasoned maker looking to refresh your memory, mastering this classic motif opens up a world of endless creative possibilities. From cozy blankets to trendy bags, learning how to construct a standard crochet square allows you to build foundational skills that apply to countless future projects.
This comprehensive guide is designed to walk you through the entire process from start to finish, ensuring you grasp the fundamental techniques needed for success. We will break down everything from selecting your materials to finishing your edges cleanly, giving you the confidence to tackle any crochet square tutorial with ease. By focusing on the core mechanics of tension, stitch placement, and yarn selection, you will soon find that creating these beautiful blocks becomes second nature.
By the end of this crochet square – tutorial, you will not only have a completed piece of fabric but also a deep understanding of how individual stitches come together to form geometric shapes. We have optimized this guide to answer the most common questions, troubleshoot frequent mistakes, and provide a clear roadmap for your crafting journey. Grab your favorite hook, select a beautiful skein of yarn, and let’s explore the wonderful, rewarding art of making a crochet square together.
When embarking on a new crochet square – tutorial, your very first step is selecting the perfect combination of yarn and hook to ensure your project turns out beautifully. For beginners, a medium-weight worsted weight yarn (often labeled as category 4) is highly recommended because it is thick enough to see your stitches clearly but not too bulky to handle.
Pairing your yarn with the correct crochet hook size is equally vital for maintaining even tension throughout your work. A standard H-8 (5.0mm) crochet hook or an I-9 (5.5mm) crochet hook works wonderfully with worsted weight fiber, allowing the yarn to glide smoothly without slipping.
We highly recommend choosing a light-colored, smooth acrylic yarn or cotton yarn for your first few practice pieces. Dark or highly textured yarns can make it incredibly difficult to see where to insert your hook, leading to missed stitches and uneven edges.
In addition to your main supplies, you will want to gather a few essential notions to keep by your side. A sharp pair of scissors and a blunt-tipped tapestry needle (or yarn needle) are indispensable for cutting your working yarn and weaving in those loose ends cleanly.
Using stitch markers can also be an absolute lifesaver when you are learning how to count your stitches and locate the exact corner spaces of your crochet square. These little plastic clips ensure you never accidentally skip a stitch or lose track of your rounds.
By setting yourself up with high-quality, comfortable materials from the very beginning, you eliminate unnecessary frustration. Taking the time to select the right tools ensures that your crochet square tutorial experience is relaxing, fun, and highly successful.
Every great crochet square – tutorial begins with a solid foundation, which serves as the center anchor for all your subsequent rounds. To start, you will need to create a secure slip knot on your hook, leaving a tail of a few inches to weave in later.
There are two primary methods to start a center ring: the traditional chain stitch ring or the popular magic ring technique. For this beginner-friendly guide, we will focus on chaining four stitches and joining them with a slip stitch into the very first chain to form a tiny loop.
Once your foundation ring is secure, you will usually chain three, which almost always counts as your very first double crochet stitch of the round. This initial chain lifts your yarn to the correct height so that your next stitches remain perfectly level and even.
Now, you will work directly into the center of the loop rather than into individual chains, making it much easier to place your stitches. Work two more double crochet stitches into the center of the ring to complete your very first distinct stitch cluster.
To form the very first corner of your geometric shape, you will chain two, and then work another cluster of three double crochet stitches into that same center ring. Repeat this exact sequence until you have four distinct clusters of three stitches, each separated by a corner space.
To close your first round, finish with a final chain two and use a slip stitch to join the top of your initial chain-three space. You will immediately notice a tiny, perfectly formed crochet square shape beginning to emerge right before your eyes.
As you move on to the next stages of your crochet square tutorial, understanding how to grow your piece while maintaining a flat shape is crucial. The secret to keeping a perfect square lies entirely within the corner spaces, where you will always place your increases.
To begin a new round, you will slip stitch across the top of your existing stitches until you reach the nearest open corner chain space. Chain three to establish your height, and then work two double crochet stitches, chain two, and three more double crochets all into that exact same corner pocket.
This specific combination of stitches creates a sturdy corner increase that allows your crochet square to expand outward without curling or buckling. As you work down the flat sides of the square, you will simply place one double crochet into each stitch from the previous row.
Whenever you encounter a straight side between corners on larger rounds, remember to chain one to skip over the gaps between stitch clusters. This creates the classic, airy look associated with a traditional granny square and keeps the fabric beautifully lightweight.
Consistency is absolutely key during this stage, so make sure you are inserting your hook into the full stitch, catching both the front and back loops. Missing a loop can accidentally create an unintended ribbed texture and alter the structural integrity of your finished crochet square – tutorial piece.
Once you complete the circuit, join the round with a slip stitch to the top of your starting chain just like you did before. With every single round you add, the sides of your square will grow longer, but the corner formula always remains exactly the same.
The difference between an amateur project and a professional-looking piece of handmade art lies entirely within the final finishing techniques. Once your crochet square reaches your desired dimensions, cut your yarn, leaving a generous six-to-eight-inch tail, and pull it completely through the final loop to fasten off securely.
Thread this trailing tail onto your tapestry needle so you can begin the vital process of concealing your loose ends. Never simply cut the yarn flush with your stitches without weaving it in first, as your hard work will quickly unravel in the wash.
Carefully guide your needle through the dense bottom loops of your double crochet clusters, moving horizontally in one direction for about an inch. To guarantee the yarn never slips out, reverse your direction and weave the needle back through a slightly different path.
Repeat this meticulous process for the starting yarn tail located at the very center of your crochet square – tutorial foundation ring. Pulling this center tail firmly before weaving it in helps close up any unwanted gaps or holes in the middle of your work.
To truly elevate the quality of your finished project, you should always perform a step known to crafters as blocking. Wet blocking involves soaking your completed square in lukewarm water, gently squeezing out the excess moisture, and pinning it flat onto a foam board.
Allowing your crochet square to air dry while pinned forces the fibers to relax, straightens out any wonky edges, and ensures perfect geometric measurements. Once dry, your beautifully blocked squares are ready to be seamed together into blankets, sweaters, or decorative home accents.
What is the best type of yarn for a beginner making a crochet square?
For beginners tackling a crochet square – tutorial, a smooth, light-colored acrylic yarn or cotton yarn in a worsted weight (category 4) is the absolute best choice. Avoid fuzzy, novelty, or extremely dark yarns, as they obscure stitch definition and make it difficult to see where to insert your hook.
Why is my crochet square curling at the edges or turning into a bowl shape?
If your crochet square is curling upward like a bowl, your tension is likely too tight, or you may have missed an increase in the corner spaces. Ensure that you are working the correct number of stitches into each corner and try relaxing your grip on the hook to loosen your stitches.
How do I connect multiple crochet squares together for a larger project?
There are several popular methods for joining squares, including using a tapestry needle for a whipstitch or mattress stitch for a seamless look. Alternatively, you can use your hook to join them using a single crochet seam, which creates a beautiful, raised decorative ridge between the motifs.
How can I tell the difference between the front and the back of my square?
The front (or right side) of a crochet square typically features clean, distinct V-shaped loops at the top of the stitches, and the fabric looks smooth. The back (or wrong side) usually has a more textured look with noticeable horizontal bars running across the base of the stitches.
Can I make a crochet square out of left-over scrap yarn?
Absolutely! Creating a scrappy crochet square is a fantastic, eco-friendly way to use up your remaining yarn stash from previous projects. Just ensure that the various scrap yarns you mix together share a similar weight category and washing care instructions so the final piece washes evenly.
Do I really need to block my finished crochet squares?
While blocking is not strictly mandatory, it is highly recommended if you want your crochet square – tutorial project to look polished and professional. Blocking relaxes the fibers, corrects minor tension irregularities, and ensures every single square is the exact same size, making the assembly process much easier.
Mastering the crochet square – tutorial is a monumental milestone for any yarn enthusiast, providing you with the essential building blocks for countless creative projects.
Throughout this article, we have explored how to select the best materials, construct a flawless foundation ring, manage corner increases, and execute professional finishing techniques like weaving and blocking. By practicing these core principles, you will develop the muscle memory and tension control needed to create beautiful, uniform motifs every single time.


