
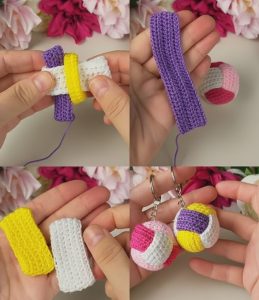
Crochet Flower - Tutorial

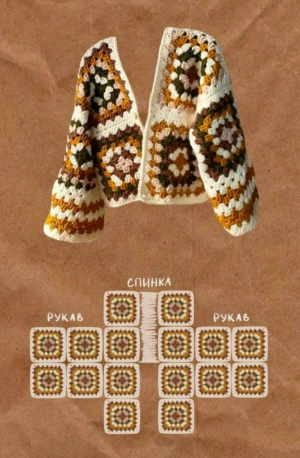
The Granny Square Jacket Crochet – Pattern is a timeless masterpiece that brings a sense of nostalgia, comfort, and high-fashion flair to any wardrobe. This iconic garment, rooted in the bohemian aesthetic of the 1970s, has made a triumphant return to the modern fashion scene, appealing to both vintage enthusiasts and contemporary makers alike. Creating your own jacket using the classic granny square technique is a rewarding journey that allows you to transform simple bundles of yarn into a wearable piece of art that reflects your personal style and creative spirit.
Embarking on a Granny Square Jacket Crochet – Pattern offers a unique opportunity to experiment with color theory and geometric construction. Unlike traditional sweaters that are worked in large, often monotonous panels, a granny square jacket is built block by block, making it an ideal “on-the-go” project. Each square is a miniature canvas where you can play with vibrant hues, variegated yarns, or sophisticated neutrals, ensuring that no two jackets are ever exactly the same. It is the ultimate project for those who want to express their individuality while mastering one of the most fundamental skills in the crochet world.
When you choose to follow a Granny Square Jacket Crochet – Pattern, you are engaging in a process that balances structural integrity with artistic freedom. The versatility of the granny square design means you can easily adjust the size, length, and silhouette of your jacket by simply adding or removing blocks or rows. Whether you envision a cropped, chic cardigan for summer evenings or a long, duster-style coat for the winter months, this crochet guide will provide the foundation you need to succeed. In the following sections, we will explore the best materials, assembly secrets, and styling tips to ensure your handmade jacket becomes a cherished heirloom.
The success of your Granny Square Jacket Crochet – Pattern begins with the “yarn pull,” as the fiber you choose will determine the drape, weight, and warmth of the final garment. For a classic, durable jacket that holds its shape, 100% cotton yarn or a cotton-acrylic blend is highly recommended. Cotton provides the structural stability needed to support the weight of multiple joined squares, ensuring that your crochet jacket doesn’t stretch out of proportion after a few wears. If you are aiming for a softer, more bohemian look, a wool-blend yarn offers beautiful texture and natural insulation.
Color selection is where the Granny Square Jacket Crochet – Pattern truly comes to life. You can opt for a “Scrappy” look by using leftover yarn from previous projects, creating a vibrant, multicolored mosaic that captures the traditional essence of the granny square. Alternatively, a “Monochromatic” palette using various shades of the same color—such as creams, beiges, and tans—can result in a sophisticated, high-end designer aesthetic. The way you arrange these colors within each square will dictate the visual rhythm of the entire garment.
Consider the “weight” of the yarn when starting your Granny Square Jacket Crochet – Pattern. A Category 4 (Worsted) weight yarn is the most common choice, providing a perfect balance between speed of construction and a manageable garment weight. Using a yarn that is too heavy (Bulky) might result in a jacket that feels cumbersome, while a yarn that is too light (Fingering) will require hundreds of squares and a significant time investment. Choosing a high-quality, anti-pilling yarn will ensure that your jacket looks brand new even after multiple trips through the washing machine.
Don’t forget the importance of the hook size in your project. Even if the yarn label suggests a specific hook, you should always crochet a “gauge swatch” first. For a Granny Square Jacket Crochet – Pattern, you want a fabric that is firm enough to be sturdy but flexible enough to move with your body. If your stitches are too tight, the jacket will feel stiff like armor; if they are too loose, it may become “floppy.” A size 5.0mm (H) hook is often the “sweet spot” for most worsted weight granny square projects.
When selecting yarns for a Granny Square Jacket Crochet – Pattern, think about the “texture” of the fiber. Some makers enjoy mixing different textures, such as adding a row of “eyelash yarn” or “bouclé” to every third square. This adds a tactile, 3D dimension to the jacket design, making it feel more like a piece of wearable textile art. However, for beginners, it is best to stick to a consistent yarn texture across all squares to ensure that the joining process is smooth and the final surface is even.
Finally, always purchase a few extra skeins of your “joining color.” In most Granny Square Jacket Crochet – Pattern designs, a single color (often black, white, or navy) is used to border every square and sew them together. This “anchor color” is what ties the eclectic squares into a cohesive garment. Running out of your joining yarn halfway through assembly can be frustrating, especially if the dye lots don’t match, so being prepared with a yarn surplus is a key step in professional garment making.
The core unit of the Granny Square Jacket Crochet – Pattern is, of course, the square itself. Most patterns use the “traditional granny,” which consists of groups of three double crochets (clusters) separated by chain spaces. Accuracy in your square dimensions is vital; every square must be exactly the same size to ensure they line up perfectly during assembly. Using a “blocking board” to stretch and set your finished squares is a professional secret that makes the joining process much easier and results in a much flatter, cleaner finish.
Once you have crocheted the required number of squares for your Granny Square Jacket Crochet – Pattern, you must plan the “layout.” This involves laying the squares out on a flat surface to create the front panels, back panel, and sleeves. This is the moment to check the color distribution; you want to ensure that no two identical colors are touching, creating a balanced and harmonious look. Taking a photo of your jacket layout with your smartphone is a helpful way to remember the arrangement as you begin to sew the pieces together.
There are several ways to join the blocks in a Granny Square Jacket Crochet – Pattern, but the “Join-As-You-Go” (JAYG) method and the “Slip Stitch Join” are the most popular. The JAYG method allows you to connect squares as you work the final round, which eliminates the need for sewing at the end. The Slip Stitch Join creates a slightly raised, decorative ridge that emphasizes the geometric nature of the crochet blocks. Whichever method you choose, consistency is the key to a professional-looking “handmade” jacket that rivals luxury boutique items.
The “Shoulder Seams” and “Underarm Joins” are the structural anchors of the Granny Square Jacket Crochet – Pattern. These areas experience the most stress during wear, so they should be reinforced with a sturdy “Mattress Stitch” or a second row of single crochet. A well-constructed shoulder prevents the sleeves from sagging and ensures the jacket sits correctly on your frame. Paying attention to these technical details ensures your garment is not only beautiful but also functional and long-lasting.
Creating the “Sleeves” for a Granny Square Jacket Crochet – Pattern can be done in two ways: by joining squares into a tube or by crocheting directly into the armhole in rounds. If you choose to join squares, you may need to create “half-squares” or triangles to fill the gaps at the shoulder cap. This geometric shaping is a great way to advance your skills and allows for a more “tailored” fit. Many modern patterns favor a “bell sleeve” or a “balloon sleeve” for an extra touch of crochet drama.
Finally, the “Edging and Cuffs” provide the finishing touch to your Granny Square Jacket Crochet – Pattern. Adding several rows of “Ribbed Stitch” (alternating front and back post double crochets) to the bottom hem, sleeves, and neckline will give the jacket a polished, “store-bought” look. You can also add pockets or a hood using the same square motif. These additions make the jacket more practical and cozy, turning a simple pattern into a versatile outerwear staple that you will want to wear every day.
One of the greatest benefits of the Granny Square Jacket Crochet – Pattern is its inherent “scalability.” To make the jacket larger or smaller, you don’t necessarily need to change the pattern; you can simply change the size of the squares. Increasing the number of rounds in each square will naturally result in a larger garment. This makes the granny square technique one of the most body-positive and inclusive methods for creating handmade clothing that fits perfectly regardless of your shape or size.
For a more “tailored” look within your Granny Square Jacket Crochet – Pattern, you can incorporate “darts” by using slightly smaller squares at the waist and larger ones at the hips and bust. This subtle shaping technique prevents the jacket from looking too “boxy” or oversized, which is a common concern with square-based garments. Understanding how to manipulate block sizes is a valuable skill that allows you to create a silhouette that flatters your unique body type while maintaining the iconic granny square aesthetic.
Length is another easy customization in the Granny Square Jacket Crochet – Pattern. You can stop at the waist for a trendy “Cropped Cardigan” look that pairs perfectly with high-waisted jeans. Alternatively, you can continue adding rows of squares until you reach your knees for a dramatic “Boho Duster” effect. The modular nature of the crochet blocks means you can even decide on the length as you go, “trying on” the panels during the assembly process to see what looks best on you.
The “Neckline” can also be adapted to your preference in a Granny Square Jacket Crochet – Pattern. A “V-neck” can be achieved by using triangular half-squares at the front opening, while a “Scoop Neck” or “Boat Neck” is easily created by adjusting the placement of the top squares. Adding a wide collar using a contrasting stitch can provide extra warmth and a more formal “blazer” feel to the jacket. This design flexibility is why the pattern remains a favorite among creative fashion designers.
Don’t forget the “Weight and Gravity” factor when customizing your Granny Square Jacket Crochet – Pattern. Large jackets made of many squares can become quite heavy. To prevent the jacket from dragging on the ground, you can add a “braided cord” or a decorative belt to help distribute the weight at the waist. Choosing a lighter-weight yarn for very long coats is also a smart way to ensure the garment remains comfortable for all-day wear without straining your shoulders.
Lastly, the “Button Band” is a crucial customization for those who want a closed jacket. You can sew on large wooden buttons for a rustic look or use “toggles” for a more adventurous, outdoor vibe. Crocheting “buttonholes” directly into the edging is a simple process that adds a lot of functionality. A well-fitted button band ensures the jacket stays closed and warm, completing the transformation from a collection of squares into a fully functional crochet outerwear piece.
Once your Granny Square Jacket Crochet – Pattern is complete, the styling possibilities are endless. For a casual “streetwear” look, pair your jacket with a simple white T-shirt, distressed denim, and sneakers. The vibrant crochet colors will act as the focal point of the outfit, turning a basic look into something extraordinary. This “maximalist” approach to fashion is very trendy and highlights the artistry and time you invested into your handmade garment.
For a more “elegant” ensemble, wear your Granny Square Jacket Crochet – Pattern over a sleek black midi-dress and ankle boots. If you made your jacket in a monochromatic or neutral palette, it can even be worn in professional settings as a creative alternative to a traditional blazer. The textural richness of crochet adds a layer of “luxury” to an outfit, proving that handmade items can be just as sophisticated as high-end designer wear when styled with confidence and care.
Accessorizing your Granny Square Jacket Crochet – Pattern can further enhance its charm. A large “statement brooch” on the lapel or a silk scarf around the neck can add a touch of personality. Since the jacket is already a bold piece, keep other accessories relatively simple to avoid “visual clutter.” A hand-crocheted bag in a matching color is a beautiful way to complete the look, showcasing your dedication to the fiber arts and a cohesive personal style.
Proper care is essential to keep your Granny Square Jacket Crochet – Pattern looking beautiful for years. Because crochet can snag easily, always store your jacket folded on a shelf rather than on a hanger. Hanging a crochet jacket can cause the weight of the squares to stretch the shoulders and ruin the fit over time. Storing it in a breathable cotton bag will protect it from dust and moths, ensuring that your hard work remains pristine and ready for the next season.
When it comes to washing your Granny Square Jacket Crochet – Pattern, hand-washing is always the safest method. Use cool water and a gentle “wool wash” detergent, and never wring or twist the garment. Instead, roll the jacket in a clean towel to remove excess moisture and lay it flat to dry in the shade. If you used acrylic yarn, a gentle machine wash in a mesh laundry bag may be possible, but always check your yarn labels first to prevent shrinking or “felting” of the fibers.
Finally, remember that a Granny Square Jacket Crochet – Pattern is more than just clothing; it is a conversation starter. People will often stop to ask if you made it yourself, providing a wonderful opportunity to share your passion for crochet. It is a symbol of “slow fashion” and a protest against mass-produced, disposable clothing. Wearing your handmade jacket is an act of pride, celebrating the patience, skill, and love that went into every single stitch of your masterpiece.
Is the Granny Square Jacket Crochet – Pattern suitable for beginners? Yes! If you know how to make a basic granny square, you can make this jacket. The “modular” construction is much less intimidating than traditional garment shaping. The most “difficult” part is the assembly and seaming, but with patience and a good crochet tutorial, even a beginner can achieve a professional-looking result.
How many squares do I need for a standard-sized jacket? For a medium-sized jacket, you will typically need between 60 and 80 squares (measuring 5-6 inches each). This depends on the desired length and sleeve style. Many Granny Square Jacket Crochet – Pattern designs provide a specific “block map” to help you calculate exactly how many squares you need for each panel and size.
What is the best way to hide the yarn “tails”? Since a granny square jacket involves many color changes, you will have a lot of ends to weave in. The best tip is to “weave as you go” or use the “magic knot” technique. Weaving the ends securely into the thick “clusters” of the granny square ensures they won’t pop out later, keeping the inside of your jacket as neat as the outside.
Can I make this jacket without a sewing machine? Absolutely! Most crocheters prefer to “sew” their jackets using a tapestry needle and yarn or by crocheting the pieces together with a slip stitch. Hand-joining creates a more flexible seam that moves with the crochet fabric. You do not need any sewing machine skills to successfully complete a high-quality granny square jacket.
How do I prevent the jacket from becoming too heavy? To keep the weight down, choose a lightweight yarn like a “DK” weight or a cotton-bamboo blend. Also, avoid using very “dense” stitch patterns for the borders. A more open, lacy granny square will use less yarn and result in a lighter, more breathable garment that is comfortable for long-term wear.
Why are my squares different sizes even though I followed the pattern? This usually happens due to “tension changes” as you get tired or more relaxed. To fix this, always check your gauge every few squares. If some squares are slightly smaller, you can often “save” them during the blocking process by stretching them slightly to match the others before you begin the final assembly.
In conclusion, the Granny Square Jacket Crochet – Pattern is a celebratory project that honors the tradition of crochet while embracing modern style. We have explored the importance of selecting the right yarn and color palette, the technical mastery of square construction and joining, and the endless ways to customize the silhouette for a perfect fit.
By focusing on quality finishing—like ribbed cuffs and blocked seams—you can transform simple squares into a sophisticated, durable garment that stands the test of time. This jacket is not just a piece of outerwear; it is a labor of love and a testament to the “prosperous” creativity found in the handmade movement. Every stitch you make contributes to a unique story of fashion and function, providing warmth and beauty for years to come.


