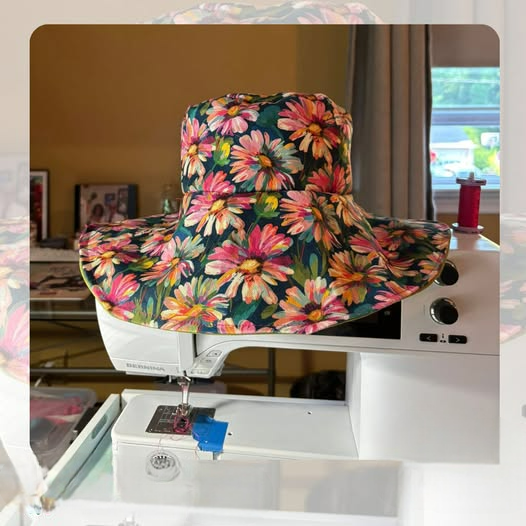
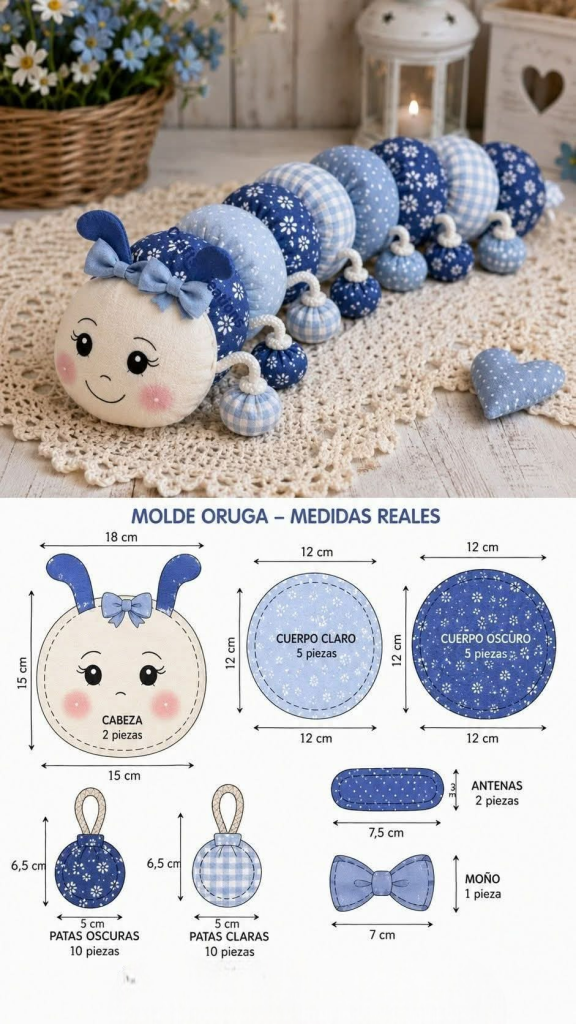
Fabric Hat - Tutorial

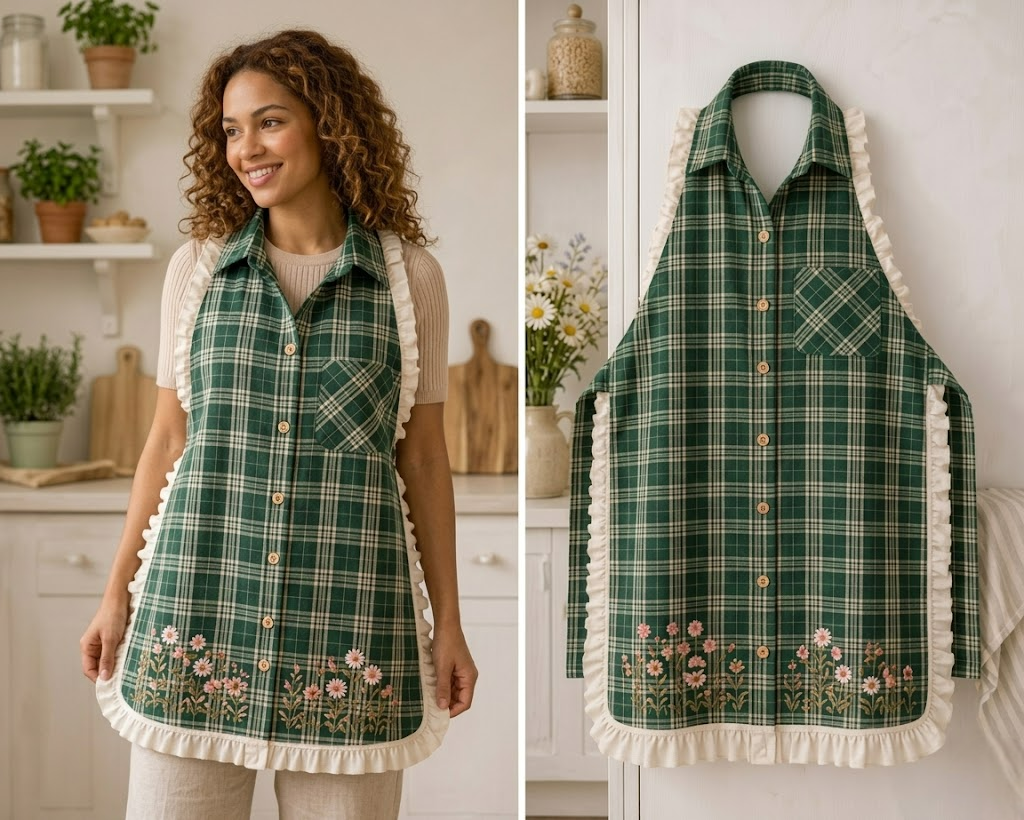
Floral Shirt Apron – Tutorial is a fantastic way to breathe new life into a piece of clothing that might otherwise be tucked away at the back of your closet. Transforming an old button-down into a functional and stylish kitchen accessory is the ultimate project for those who value sustainable fashion and creative sewing. This specific repurposing project allows you to preserve the beauty of floral patterns while creating something that is both practical and sentimental.
When you embark on a Floral Shirt Apron – Tutorial, you are not just making a garment; you are mastering the art of upcycling. Choosing a shirt with a vibrant print ensures that your final product stands out, making chores feel a bit more cheerful. Throughout this guide, we will explore the essential steps to ensure your DIY apron has a professional finish, focusing on clean lines and durable stitching.
Crafting a Floral Shirt Apron – Tutorial requires minimal materials but yields impressive results. By utilizing the existing hem and button placket of a shirt, you significantly reduce the amount of sewing needed, which is perfect for beginners and seasoned experts alike. Let’s dive into the details of how to select your fabric, cut your pattern, and assemble a piece that showcases your handicraft skills and environmental consciousness.
The foundation of a successful Floral Shirt Apron – Tutorial starts with the material. Look for a 100% cotton shirt, as this fabric is breathable and holds its shape well during the cutting and sewing process. Cotton is also highly absorbent, which is a key feature for any high-quality kitchen apron.
Check the floral pattern for scale and orientation. A medium-sized floral print usually works best because it remains visible even after the fabric is cut into smaller sections. Ensure the colors are vibrant and that the fabric doesn’t have significant thinning or holes in the areas you plan to use for the main body.
Consider the size of the original garment. An XL or XXL men’s shirt provides more fabric surface area, allowing for a full-coverage apron with long ties. If you are using a smaller shirt, you might need to supplement the waist ties with matching ribbon or bias tape from your scrap bin.
The buttons are another crucial element of the Floral Shirt Apron – Tutorial. Since the front placket often becomes the center detail of the apron, make sure all buttons are secure and match the aesthetic. You can even swap out plain buttons for decorative vintage buttons to add a personalized touch.
Don’t forget to wash and iron the shirt before you begin. Pre-washing fabric is a standard SEO-friendly sewing tip because it prevents the finished apron from shrinking or warping after its first trip through the laundry. A crisp, ironed shirt is much easier to measure and cut accurately.
Lastly, think about the weight of the fabric. A lightweight flannel or a sturdy poplin makes for a durable protective garment. Avoid silk or very sheer fabrics, as they won’t provide the necessary protection against kitchen spills or craft room messes that a Floral Shirt Apron – Tutorial aims to prevent.
To begin the technical part of the Floral Shirt Apron – Tutorial, lay the shirt flat on your cutting mat. You will primarily be using the back of the shirt for the main apron panel and the front sections for pockets or accents. Use fabric shears to remove the sleeves and the collar carefully.
Creating the “armhole” curves of the apron is where the shape truly comes to life. Start the cut about mid-way down the side seam and curve it up toward the neckline. This contoured shape ensures that the apron fits comfortably around the chest and allows for a full range of motion while you work.
The back of the shirt is often a solid piece of fabric, making it the ideal “canvas” for your floral design. If the shirt has a back yoke, you can choose to include it for a tailored look or cut below it for a simpler, rectangular apron body. Precision at this stage defines the quality of your handmade apron.
Save the sleeves! In any Floral Shirt Apron – Tutorial, the sleeves are gold mines for extra material. They can be deconstructed to create long apron strings or folded and stitched to form sturdy loops for hanging towels. Zero-waste sewing is a highly searched and respected practice in the crafting community.
If your shirt has a front pocket, try to preserve it. You can fussy-cut around the pocket and applique it onto the front of your new apron. Adding a functional pocket is essential for holding recipes, phones, or sewing tools, making your Floral Shirt Apron – Tutorial even more useful.
Always leave a seam allowance of at least half an inch. When you are working with upcycled clothing, edges can fray more easily than bolt fabric. Using a serger or a zigzag stitch on the raw edges will ensure your project lasts for years without unraveling.
Now that your pieces are prepped, it is time to sew. The first step in the assembly phase of this Floral Shirt Apron – Tutorial is to finish the curved edges. Double-fold the fabric and pin it securely. Using a straight stitch, sew slowly along the curves to avoid bunching or puckering.
Attaching the waist ties is a critical point for durability. Whether you made the ties from the shirt sleeves or used coordinating fabric, be sure to backstitch several times at the attachment point. This reinforcement prevents the ties from ripping off when you knot them tightly around your waist.
The top of the apron, known as the bib, needs a clean finish. You can create a casing for an adjustable neck strap. This is a popular feature in any Floral Shirt Apron – Tutorial because it allows the apron to fit different body types perfectly. Simply fold the top edge over and sew, leaving enough room for a strap to slide through.
If you are adding a contrasting border, consider using a solid color that matches one of the tones in the floral print. This color coordination elevates the look of the apron from a simple craft project to a professional-grade boutique accessory. SEO keywords like “professional finish” and “design tips” are vital here.
Take a moment to check the alignment of your floral patterns. If your shirt had stripes or a specific direction to the flowers, ensure they aren’t upside down. A well-aligned Floral Shirt Apron – Tutorial shows attention to detail and increases the “shareability” of your work on social media platforms.
The final hem at the bottom should be straight and even. Since many shirts have a curved “shirt-tail” hem, you may need to trim it straight or embrace the curve for a unique scalloped look. A wide hem at the bottom adds a bit of weight, helping the floral apron hang nicely against the body.
The beauty of a Floral Shirt Apron – Tutorial lies in the customization. You can add lace trim or rick-rack along the pockets to enhance the vintage feel of the floral print. These small additions make your upcycled project feel like a one-of-a-kind piece of art.
Consider adding embroidery or a monogram to the bib. If the floral pattern is busy, a solid-colored patch with an embroidered initial can provide a lovely visual break. This level of personalization is what makes handmade gifts so special and sought after in the crafting niche.
For those who use their aprons for heavy-duty cooking, adding a D-ring to the neck strap makes it easily adjustable. This technical addition is a great way to showcase your sewing expertise. A Floral Shirt Apron – Tutorial that includes functional hardware is always a hit with practical crafters.
If your fabric is particularly lightweight, you might consider adding a lining. Using a simple white muslin or another old shirt as a backing provides extra protection against stains. Lined aprons feel more substantial and offer a cleaner look on the inside, hiding all the raw seams.
Pressing your finished piece is the “secret ingredient” to a professional result. Use plenty of steam to flatten the seams and give the floral fabric a crisp appearance. A well-pressed Floral Shirt Apron – Tutorial looks much better in photos, which is essential for SEO and attracting readers to your blog.
Finally, do a quality check. Trim any loose threads and ensure the buttons are tight. Your Floral Shirt Apron – Tutorial is now complete! You have successfully turned a forgotten garment into a beautiful, sustainable apron that is ready for the kitchen, the garden, or the craft room.
What size shirt do I need for a Floral Shirt Apron – Tutorial?
Ideally, a Large or Extra-Large shirt provides the best amount of fabric for a full-sized adult apron. However, a Small or Medium shirt can easily be turned into a child’s apron or a “half-apron” that ties only at the waist.
Can I make this if I don’t have a sewing machine?
Yes, while a machine is faster, this Floral Shirt Apron – Tutorial can be done by hand using a backstitch for the structural seams and a running stitch for the hems. It just requires a bit more patience!
How do I clean my floral apron?
Since it is made from a standard shirt, you can usually machine wash it on a cold cycle. To preserve the vibrant floral colors, air drying is recommended, followed by a quick iron to keep it looking sharp.
Is it possible to use a knit/t-shirt for this project?
It is possible, but jersey fabric (t-shirt material) tends to roll at the edges and stretch. For this specific Floral Shirt Apron – Tutorial, a woven button-down shirt is much easier to work with and provides better protection.
What if the shirt has a stain?
This is the perfect time for creative patching! You can cover a small stain with a decorative pocket, a piece of applique, or even a cute fabric flower made from the leftover sleeve material.
Creating a Floral Shirt Apron – Tutorial is a rewarding experience that combines environmental responsibility with the joy of sewing. We have covered everything from selecting the right 100% cotton shirt and planning your cuts to the final assembly and decorative flourishes.
This project proves that with a little bit of creativity, an old piece of clothing can be transformed into a functional and beautiful floral accessory for your home. By following these SEO-optimized steps, you now have the knowledge to create a professional-quality apron that reflects your personal style.
