Fabric Hat - Tutorial

Crafting your very own fabric hat tutorial is one of the most rewarding sewing projects you can undertake, offering a perfect blend of practical sun protection and personal style. Whether you want to shield your face during sunny beach days, add a handmade touch to your daily wardrobe, or create a thoughtful gift for a loved one, mastering a fabric hat tutorial allows you to customize every single detail. From choosing vibrant cotton prints to selecting the perfect brim width, creating DIY accessories gives you total creative freedom over your fashion choices.
Many people feel intimidated by the idea of sewing headwear, assuming that the curved lines and structured brims require advanced professional tailoring skills. However, this step-by-step fabric hat tutorial is specifically designed to break down the entire process into simple, highly manageable steps that anyone with a basic sewing machine can master. By understanding how different fabric pieces lock together, you will quickly realize that sewing a durable, comfortable, and beautiful headwear piece is completely achievable at home.
In this comprehensive guide, we will explore the essential materials, precise cutting techniques, assembly steps, and professional finishing touches needed to bring your project to life. This detailed fabric hat tutorial focuses on a classic, versatile design that suits various head sizes and style preferences perfectly. Prepare your sewing space, gather your favorite textile scraps, and let us dive into the wonderful world of handmade millinery to create an accessory you will be proud to wear.
Selecting the perfect textile is the foundational step of any successful fabric hat tutorial, as the weight and texture of your material directly impact the final structure. For a sturdy yet breathable summer accessory, 100% quilting cotton, canvas fabric, denim materials, and linen blends are excellent options that sew beautifully.
The interior structure is just as important as the exterior look, which is why a high-quality fusible interfacing is absolutely vital for this project. Interfacing adds necessary stiffness to the brim, preventing it from flopping into your eyes while maintaining a crisp, professional silhouette.
When gathering your supplies for this fabric hat tutorial, do not forget to match your heavy-duty sewing thread with the color of your main textile. Using a high-quality polyester or strong cotton thread ensures that the seams can withstand regular wear, folding, and occasional washing.
You will also need standard sewing tools, including sharp fabric shears, a rotary cutter, a cutting mat, quilting pins, and a reliable tailor’s chalk for marking. Having these tools organized beforehand makes the assembly phase much smoother, faster, and more enjoyable.
If you are a beginner, it is highly recommended to avoid slippery fabrics like silk or highly stretchy knits for your first fabric hat tutorial attempt. Stiff, woven options are much easier to control under the presser foot and yield predictable, satisfying results.
Lastly, consider pre-washing your chosen materials before cutting any patterns out, as natural fibers like cotton tend to shrink during their first wash cycle. Pre-shrinking your textiles ensures that your finished, custom-made accessory maintains its exact dimensions and perfect fit forever.
To begin the structural phase of our fabric hat tutorial, you will need to measure your head circumference accurately using a flexible measuring tape. Measure around the widest part of your head, just above your eyebrows and ears, to find your base measurement.
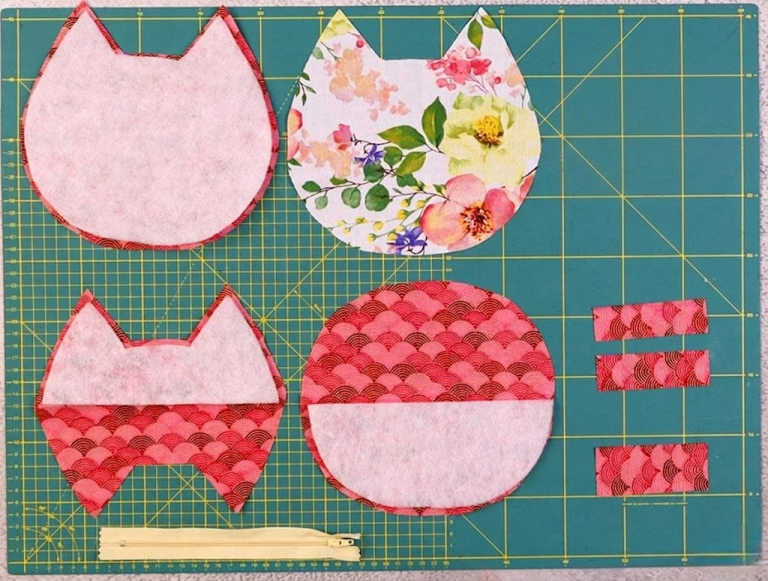
A standard adult bucket style typically consists of three main pattern components: the top crown circle, the side crown band, and the crescent-shaped brim pieces. You will need to cut duplicate pieces of each component from both your main exterior textile and your lining material.
Carefully pin your paper template onto the fabric, paying close attention to the fabric grainline to ensure the pieces drape and stretch correctly. Use your sharp shears to cut two top circles, two side bands, and four brim pieces to create a fully lined accessory.
Once your textile pieces are ready, use the exact same templates to cut out your stiff fusible interfacing sheets. For this specific fabric hat tutorial, you only need to apply the interfacing to the exterior brim pieces and the exterior side band.
To apply the stabilizer, place the adhesive side of the interfacing against the wrong side of your exterior fabric pieces on your ironing board. Press firmly with a hot steam iron for about ten to fifteen seconds, allowing the heat to permanently fuse the layers together.
Taking your time during this preparation stage guarantees that all your edges are perfectly uniform, which makes alignment seamless during sewing. Accurate cutting is the secret weapon behind any high-end, store-quality handmade project, so avoid rushing this foundational process.
With all your pieces cut and stabilized, it is time for the most exciting part of the fabric hat tutorial: watching the 3D shape take form. Start by taking your two exterior side band pieces, pinning the short ends together with right sides facing, and sewing them to form a continuous loop.
Repeat this exact step for the lining side bands, making sure to use a standard quarter-inch seam allowance unless your specific pattern dictates otherwise. Press all these newly formed vertical seams open with your iron to reduce bulkiness at the sides.
Next, carefully pin the top crown circle to the upper edge of your continuous side band loop, matching the right sides together perfectly. Because you are attaching a straight edge to a curve, use plenty of sewing pins or fabric clips to prevent puckering.
Slowly sew around the circle, gently guiding the fabric under the needle and rotating it smoothly to maintain a consistent seam line. Once stitched, clip small V-shaped notches into the seam allowance to help the circular fabric lay flat and smooth.
Now, move on to the brim by pinning your crescent pieces together in pairs along the short sides, creating two large circular hoops. Stitch the short ends, press the flat seams open, and then place the two large hoops together with right sides facing.
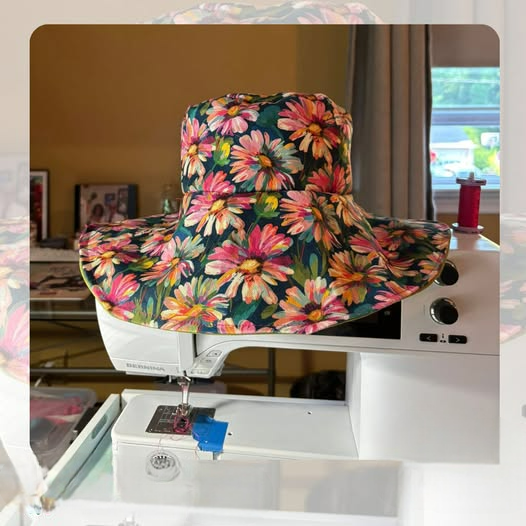
Sew along the outer curved edge of the brim hoops, flip the unit right side out through the open center, and press flat. Topstitch several concentric rows across the brim to give it that iconic, sturdy ribbed texture that defines a professional fabric hat tutorial.
The final assembly phase of our fabric hat tutorial brings the exterior crown, the structured brim, and the soft inner lining together into one cohesive unit. Pin the raw, open inner edge of your completed brim to the bottom raw edge of your assembled exterior crown.
Ensure the right sides of the fabric are facing each other, and align the side seams perfectly so the finished piece looks symmetrical. Baste these two sections together using a long, loose temporary stitch on your machine to hold them securely in place.
Next, take your completed lining crown and slip it over the exterior crown assembly, ensuring the right sides are touching inside. The basted brim should now be sandwiched neatly between the exterior crown layer and the interior lining layer.
Pin securely around the entire circular bottom edge, leaving a small three-inch opening at the back section for turning the project right side out. Sew completely around the circumference using a sturdy, standard straight stitch, making sure to backstitch firmly at the opening.
Carefully pull the entire project through the three-inch gap, revealing the right sides of your beautiful, newly constructed headwear piece. Push the lining down into the inside of the crown, and use your iron to press the bottom opening edges flat and even.
To complete your fabric hat tutorial, topstitch a clean line around the entire base of the crown, which beautifully closes the turning gap. This final line of stitching secures the lining permanently, prevents shifting, and gives your handmade accessory a flawless retail finish.
What is the best fabric to use for a beginner fabric hat tutorial?
The best choices for beginners are stable, non-slippery woven fabrics like 100% cotton canvas, medium-weight denim, or sturdy quilting cotton. These materials resist shifting under the sewing machine needle, hold creases beautifully when ironed, and accept fusible interfacing easily, making your first assembly experience highly successful.
Why is my hat brim too floppy, and how can I fix it?
A floppy brim usually happens when the fusible interfacing used is too thin or omitted entirely. To fix or prevent this in your fabric hat tutorial, use a medium-to-heavyweight craft interfacing, or sew multiple concentric rows of topstitching about a quarter-inch apart across the entire brim to add mechanical stiffness.
How do I clean and wash a handmade fabric hat?
Since most DIY options utilize cotton and fusible stabilizers, it is best to hand wash your accessory in cool water with a mild detergent to preserve its structure. Avoid wringing the brim; instead, reshape it by hand while damp, and air dry it over a clean bowl or hat form to maintain its original round shape.
Can I make this fabric hat tutorial reversible?
Yes, absolutely! To make it completely reversible, simply choose two different, complementary decorative fabrics for your exterior and lining layers. When finishing the project, instead of leaving a gap in the brim seam, leave the turning gap inside the lining crown, hand-stitching it closed afterward with an invisible ladder stitch.
In this fabric hat tutorial, we covered everything from measuring your head and selecting structural textiles to assembling the crown, stabilizing the brim, and sewing a flawless hidden lining.
By taking the process step by step, you have learned how easy it is to transform simple flat pieces of woven cloth into a beautiful, functional, and fashionable 3D accessory. Sewing your own headwear not only enhances your wardrobe but also expands your technical crafting skills, giving you the confidence to tackle more complex garment projects in the future.