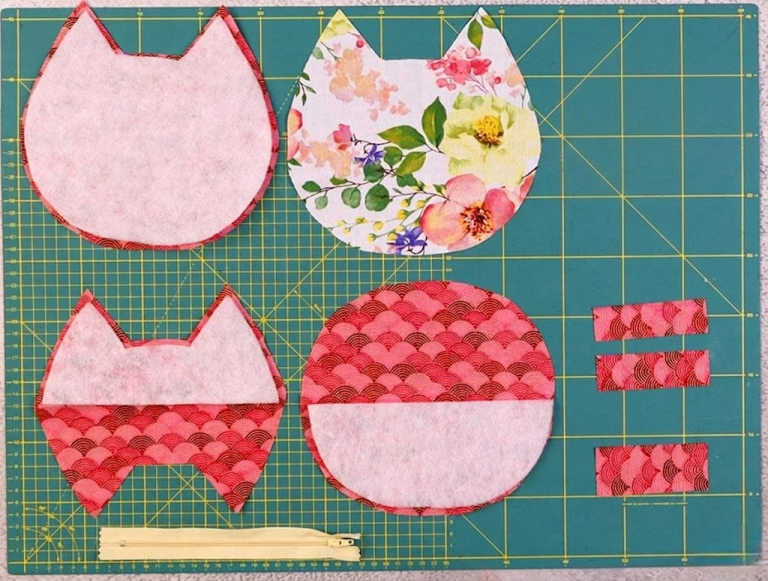
Fabric Hat - Tutorial

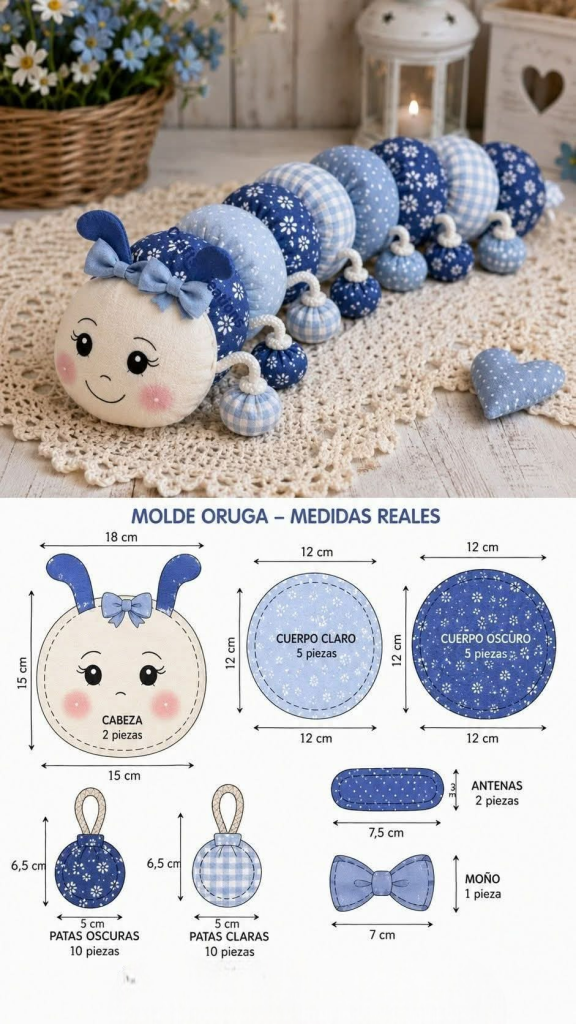
Welcome to the ultimate Yo-Yo Centipede – Tutorial where we dive deep into one of the most charming, whimsical, and creative scrap-busting projects in the crafting world. Fabric yo-yos, also known as Suffolk puffs, have a rich history in quilting and textile arts, offering a wonderful way to transform tiny bits of leftover fabric into beautiful, dimensional works of art. By joining these little fabric circles together in a playful sequence, you can create a delightful, flexible fabric toy or home decor piece that brings joy to both children and adults alike.
In this comprehensive fabric yo-yo centipede tutorial, we will walk you through every single step required to design, sew, and assemble your very own colorful insect companion. This project is absolutely perfect for beginners who want to practice their hand-sewing skills, as well as experienced quilters looking for a fun, relaxing project to clear out their scrap bins. From choosing the right materials to mastering the basic running stitch, this guide covers everything you need to know to achieve a professional, durable, and adorable finish.
Crafting should always feel personal and rewarding, which is why this step-by-step yo-yo centipede guide focuses on customizable techniques that allow your unique creativity to shine through. Whether you want to make a bright, multi-colored sensory toy for a child, a rustic farmhouse decoration using muted country tones, or a fun upcycled project using old denim and cotton scraps, the possibilities are completely endless. Grab your needle, thread, and fabric stash, and let us begin making this wonderful textile creature together.
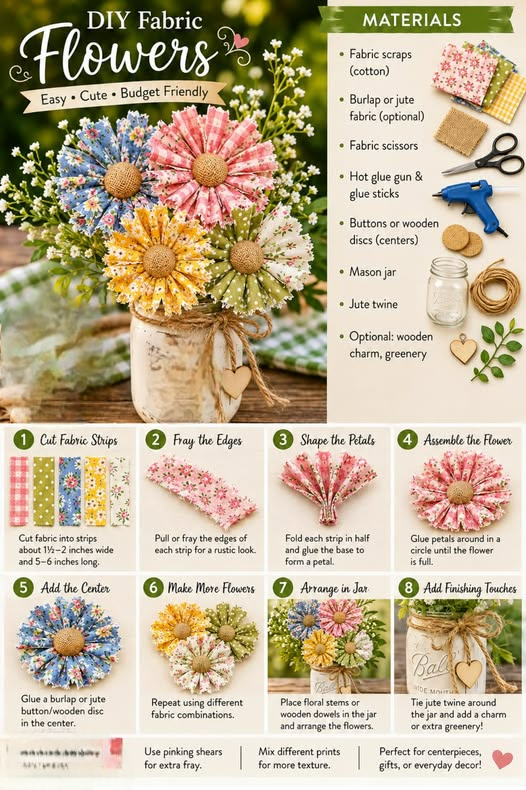
Before you begin stitching your project, gathering the correct tools will ensure a smooth and enjoyable crafting experience from start to finish. The beauty of this project lies in its simplicity, requiring only basic sewing supplies that you likely already have in your crafting room or sewing basket.
To start, you will need a variety of cotton fabric scraps to form the individual body segments of your colorful creature. Lightweight quilting cotton works best because it gathers easily without creating too much bulk in the center of your circles.
Next, you must select a durable hand-sewing thread and a sharp needle that can easily pass through multiple layers of gathered fabric. Using a stronger thread, like a heavy-duty cotton or a polyester blend, prevents snapping when you pull the stitches tight.
For the templates, a sturdy piece of cardboard or a plastic yo-yo maker will help you cut perfectly consistent circles every single time. The size of your starting circle determines the final size of each individual segment of your finished insect.
Do not forget to prepare materials for the face, such as small buttons for eyes or some embroidery floss to stitch a cute, friendly smile onto the head. You can also use felt scraps to create tiny cheeks or cute antennas for added personality.
Finally, you will need sharp fabric scissors for clean cuts, an erasable fabric marker for tracing your circles, and a small amount of polyester fiberfill or cotton stuffing to give the head segment a plump, dimensional look.
Mastering the basic fabric circle assembly is the core foundation of this entire project, and it is a wonderful, meditative skill to learn. To begin, trace your circle template onto the wrong side of your chosen fabric using your erasable marking pen.
Carefully cut out the circles along your traced lines, ensuring your edges are smooth, as clean cuts lead to much neater gathers. Once your circles are cut, thread your needle with a double strand of thread and tie a secure knot at the end.
Fold the raw edge of the fabric circle over by about an eighth of an inch toward the wrong side as you work your way around. Insert your needle and begin a simple running stitch close to the folded edge, keeping your stitches evenly spaced.
Continue stitching all the way around the perimeter of the circle until you reach your starting point, ensuring your final stitch ends on the same side. Gently hold the fabric and pull the thread tails to draw the edges together, watching the circle gather into a beautiful puff.
Once the circle is completely gathered into a tight rosette, distribute the folds evenly around the center opening with your fingers. Press the yo-yo flat with your hand or a warm iron, then make a few secure knots in the center to hold it tight.
Repeat this exact process for all the body segments, mixing and matching your colorful fabric combinations to create a stunning visual gradient or a fun pattern. You will need anywhere from twenty to forty individual pieces depending on how long you want your finished creature to be.
Now that you have a colorful collection of finished fabric rosettes, it is time to bring your creation to life by assembling the body. Arrange your pieces in a long row on your workspace, experimenting with color placement until you find a sequence that looks visually appealing.
To connect the pieces securely, you will use a strong blind stitching technique to join the flat sides of the rosettes together. Thread your needle with matching or neutral thread, making sure to use a double strand for extra strength and durability.
Take the first two body pieces and place them back-to-back, matching up the center openings so they face inward or look uniform. Pass your needle through the gathered centers of both pieces, pulling tight and securing them with a strong hidden knot.
Continue adding segments one by one, passing your needle through the center of the new piece and connecting it firmly to the previous one. Ensure your tension is firm so the body stays connected, but leave just enough flexibility so your toy can bend and wiggle.
As you build the body, you can choose to alternate the sizes of your pieces, placing larger ones near the front and smaller ones toward the tail. This clever tapered fabric toy design gives your completed craft a much more realistic, organic look and dynamic movement.
Once all the body segments are securely attached, pass your needle back through the last few pieces to lock the thread in place. Tie a final, durable knot hidden between the layers of fabric and trim any excess thread tails for a clean appearance.
The final stage of our project involves giving your handmade creature its unique personality through expressive facial details and fun embellishments. The head segment should be slightly larger and stuffed with a bit of fiberfill before you pull the gathers completely closed.
To create the face, sew two small black buttons onto the front of the stuffed head segment to act as expressive, shining eyes. If you are making this item for a very young child, choose embroidered fabric eyes instead of buttons to ensure it is completely safe.
Using a contrasting color of embroidery floss, stitch a small, cheerful smile just below the eyes using a simple backstitch. You can also add small circles of pink felt using fabric glue to give your new insect friend adorable, rosy cheeks.
For the antennas, you can use short pieces of fabric-covered wire, knotted yarn, or small strips of felt sewn directly into the top of the head. Adding a tiny knot at the end of each antenna gives them a classic, playful look that completes the silhouette.
If you want to give your creature little legs, you can attach small loops of ribbon or braided embroidery floss to the bottom of each segment. This optional step adds wonderful texture and makes the finished piece even more engaging for little hands to play with.
Take a moment to inspect your completed project, clipping any loose threads and gently fluffing out the body segments so they look perfectly uniform. Your beautiful, handmade creation is now ready to be displayed, gifted, or enjoyed as a delightful, cozy companion.
Lightweight woven fabrics like 100% quilting cotton, lawn, or gingham are the absolute best choices for this project. They fold easily, do not fray excessively during handling, and create clean, tight gathers without adding unwanted bulk to the center of your rosettes.
It is highly recommended to spot clean or gently hand wash your finished project to protect the delicate hand stitching and any attached details like buttons or felt. If you must use a machine, place the toy inside a mesh lingerie bag and use a gentle, cold-water cycle.
For a medium-sized companion measuring around 12 to 15 inches in length, you will generally need between 25 and 35 individual body segments. You can easily customize the length by adding more pieces for a longer look or using fewer pieces for a cute mini version.
If you are planning to give this toy to an infant or toddler, you must replace plastic buttons, wires, and beads with safe alternatives. Use embroidery thread to stitch on the eyes and mouth, and ensure all body segments are sewn together with extra-strong, heavy-duty thread.
No, you do not need a specialized commercial tool to create beautiful results for this craft. A simple homemade cardboard circle template works beautifully; the plastic makers simply help speed up the process if you plan on making dozens of pieces.
In this Yo-Yo Centipede – Tutorial, we have explored the wonderful art of turning simple fabric circles into a charming, flexible textile companion. We covered everything from gathering your essential cotton scraps and tools, to mastering the running stitch, assembling the colorful body segments, and adding those final, expressive facial features.
This project is a spectacular way to embrace sustainable crafting while making something truly unique.