Fabric Hat - Tutorial

Fabric pants bags – tutorial setups are taking the crafting world by storm, and it is easy to see why. Transforming old, worn-out trousers into a stylish, functional accessory is the ultimate way to blend sustainability with personal flair. Whether you have a closet full of outdated denim or lightweight linen trousers that no longer fit, learning how to repurpose them into gorgeous totes, everyday purses, or sturdy market bags is a rewarding project that anyone can master with a little guidance.
Creating your own fabric pants bags allows you to express your unique style while reducing textile waste. Instead of letting old clothes end up in a landfill, this hands-on project gives them a second life as a durable and trendy accessory. This comprehensive guide will walk you through every single step of the process, ensuring you achieve a professional finish even if you are relatively new to the world of sewing.
In this ultimate fabric pants bags – tutorial, you will discover just how simple it is to turn ordinary leg panels and waistbands into structural masterpieces. From selecting the best parts of the fabric to mastering the essential assembly techniques, we will cover all the bases to guarantee your crafting success. Grab your old trousers, fire up your sewing machine, and let’s dive straight into this creative and eco-friendly journey.
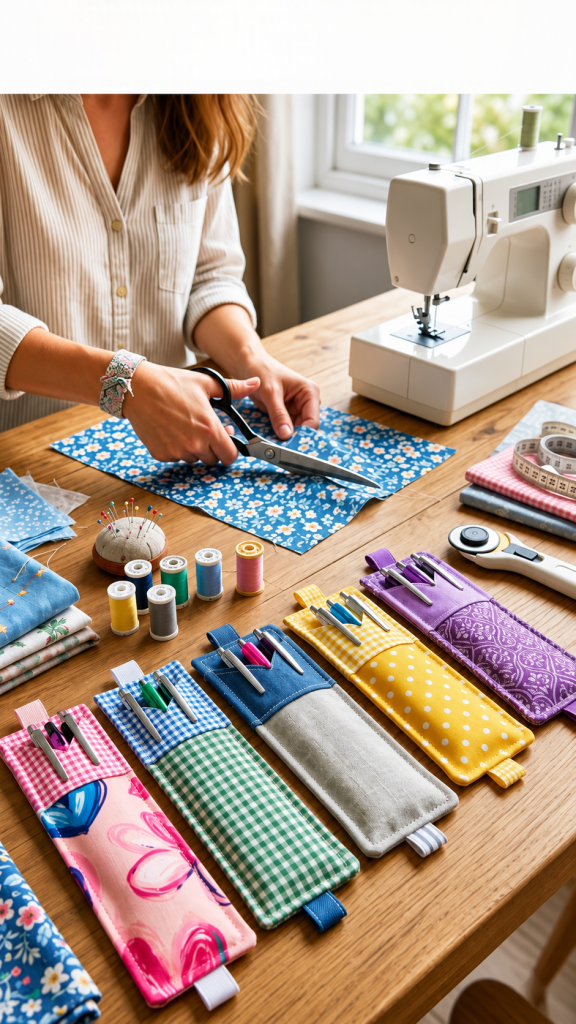
Before you begin drafting your pattern, you need to gather the essential tools that will make crafting your fabric pants bags a smooth and enjoyable experience. The choice of material is crucial because different types of trousers yield different styles of bags. Sturdy materials like denim or heavy canvas offer excellent structural support, while softer cotton or linen pants create casual, slouchy hobo bags that are perfect for summer outings.
To ensure your fabric pants bags – tutorial project goes flawlessly, you will need a reliable pair of fabric shears that can cut cleanly through thick seams. Dull scissors can fray the edges of your fabric and make precise cutting incredibly difficult. Additionally, keep a good supply of sewing pins or quilting clips nearby to hold your pieces securely in place before you start running them under the needle.
Thread selection is another key factor that shouldn’t be overlooked when making fabric pants bags. If you are working with heavy denim, opting for a heavy-duty polyester thread or a specialized topstitching thread will give your bag the strength it needs to carry daily essentials. Matching the thread color to your fabric creates a seamless look, while choosing a contrasting color can add a beautiful, intentional design element to your finished piece.
You will also need a sewing machine equipped with the correct needle size for your chosen fabric. For thick textiles, a size 90/14 or 100/16 jeans needle is highly recommended to prevent bending or breaking while stitching through multiple layers. A standard measuring tape, a fabric marking pen, and a reliable iron for pressing your seams flat are also essential for achieving that crisp, professional look.
If you want to elevate the functionality of your creation, consider incorporating lining fabric and sturdy hardware. Cotton fat quarters work wonderfully for internal linings, adding a fun pop of color whenever you open your bag. Hardware elements such as magnetic snaps, metal zippers, or D-rings can turn a simple upcycled project into a high-end boutique item.
Lastly, do not forget to save the scraps from your trousers, such as the belt loops, original pockets, and waistbands. These elements can be creatively repurposed as functional handles, external phone pockets, or decorative trims on your new bag. Organizing your workspace with all these materials beforehand will streamline your workflow and make the entire sewing process incredibly efficient.
The key to a beautiful finished product lies entirely in how well you prepare your materials before making a single cut. Always start by thoroughly washing and drying the trousers you plan to use for your fabric pants bags. This step is vital because it pre-shrinks the fabric and removes any dirt or oils, ensuring that your final measurements remain completely accurate after future washes.
Once your pants are clean, use a hot iron to press out every single wrinkle, paying extra attention to the areas around the seams and pockets. Pressing the fabric flat makes it infinitely easier to mark your dimensions accurately and prevents accidental misalignment during the cutting phase. A flat canvas is essential for achieving straight lines and symmetrical panels.
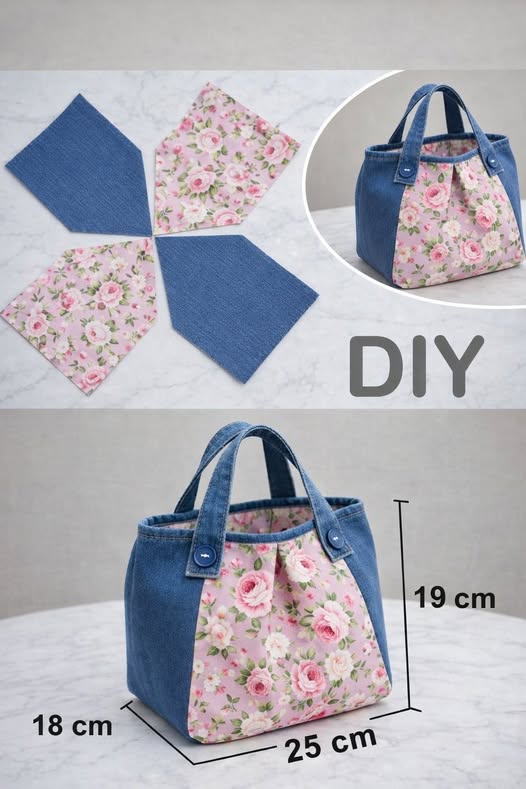
Now, lay your trousers completely flat on a wide cutting table or a self-healing cutting mat. To maximize the fabric yield for your fabric pants bags – tutorial layout, carefully cut along the inner leg seams to open up the pant legs into wide, flat sheets of cloth. This technique gives you the maximum continuous surface area to work with, allowing you to cut out larger bag panels without awkward seams interfering.
Use a clear quilting ruler and a piece of tailor’s chalk to mark your desired bag dimensions directly onto the wrong side of the fabric. Standard tote configurations usually require two matching rectangular panels for the main body, typically measuring around 14 by 16 inches. Be sure to leave an extra half-inch on all sides to account for your sewing seam allowances.
If you want to utilize the original pockets of the trousers, strategically place your pattern pieces so that the pockets land exactly where you want them on the outside of your bag. This clever placement saves you the trouble of sewing extra pockets later and preserves the authentic, upcycled aesthetic of the original garment. Double-check your alignments before making any cuts to ensure everything is perfectly level.
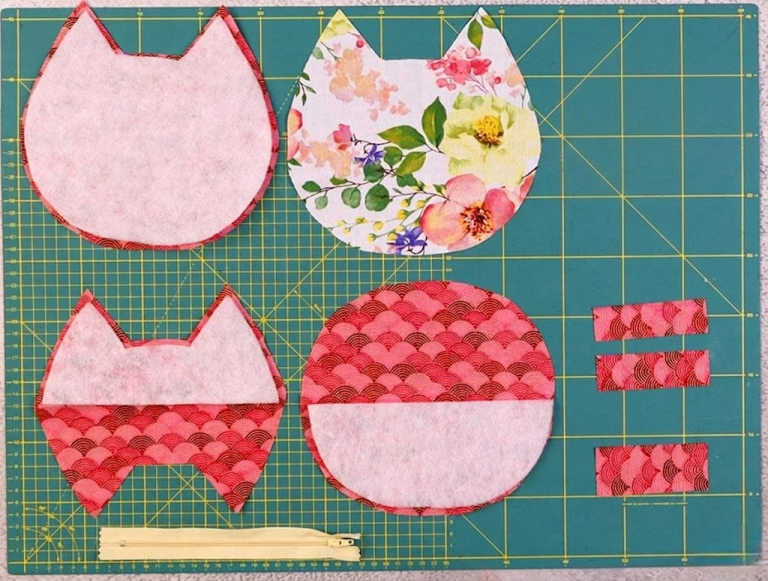
Carefully cut along your chalk lines using your sharp fabric shears, maintaining steady pressure to keep the edges as smooth as possible. Once your front and back body panels are cut, cut out long strips from the remaining fabric to create your shoulder straps or handles. If your leftover material isn’t long enough for continuous straps, you can piece smaller strips together or use webbing strap material instead.
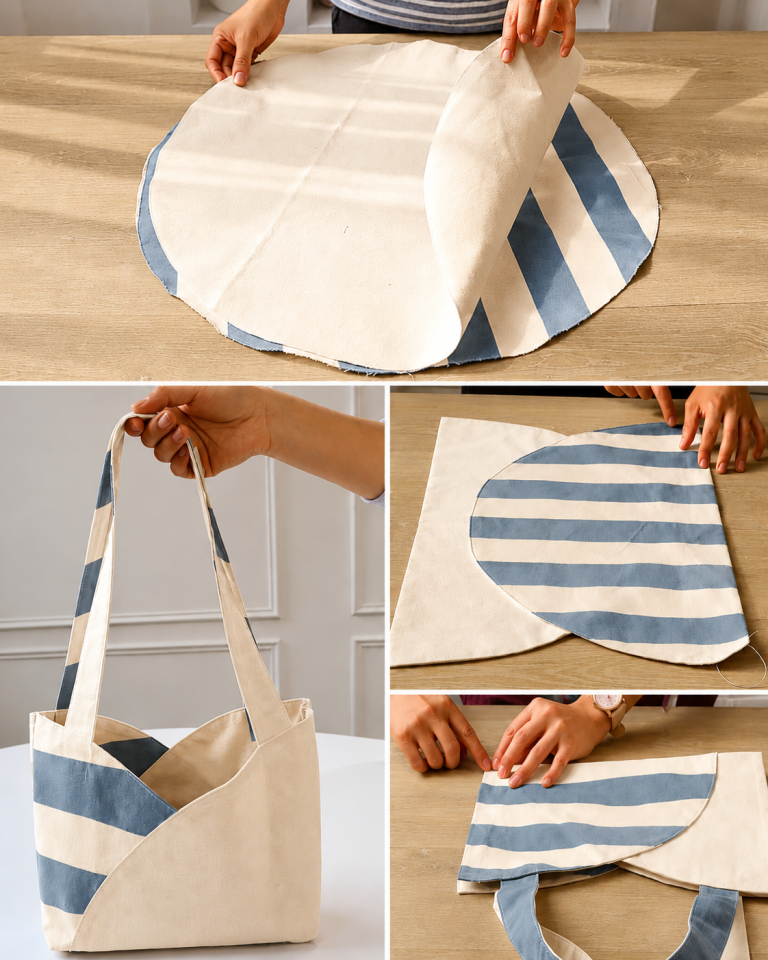
With all your pieces beautifully prepped, it is time for the most exciting part of the fabric pants bags – tutorial: assembling the structure. Start by placing your two main fabric panels right sides together, ensuring all the outer edges line up perfectly. Pin securely along the two sides and the bottom edge, leaving the top opening completely clear for now.
Take your pinned pieces to the sewing machine and stitch along the sides and bottom using a standard straight stitch and your designated seam allowance. To ensure your fabric pants bags are incredibly durable, always backstitch a few times at the beginning and the end of each seam. This simple step locks the threads in place and prevents the bag from pulling apart when carrying heavier items.
To give your bag a professional interior finish and prevent the raw edges of the fabric from fraying over time, use a zigzag stitch or a serger along the raw edges of your seams. If you are working with very thick fabric, trimming down the seam allowances slightly can help reduce bulk, allowing the corners to turn out much sharper and cleaner.
If you want your bag to stand upright on its own, you can easily box the bottom corners. To do this, pull the front and back fabric apart at one bottom corner, flattening it out into a triangle shape where the side seam meets the bottom seam. Mark a straight line perpendicular to the seam line, stitch across it, and trim away the excess triangle of fabric to create a flat, structural base.
Next, prepare your handles by folding your fabric strap strips lengthwise with the right sides facing together, stitching down the long edge, and turning them right side out. Press the straps flat with your iron, and add a neat row of topstitching along both long edges for a crisp, store-bought appearance. Pin the ends of the completed handles to the top raw edge of your bag body, spacing them evenly.
If you are adding a lining, sew the lining pieces together in the exact same manner as the outer bag, but leave a small four-inch opening at the bottom seam. Slip the outer bag inside the lining bag so their right sides are facing, align the top edges with the handles sandwiched in between, and stitch all the way around the top rim. Pull the entire bag right side out through the opening in the lining, stitch the opening closed, and tuck the lining inside.
The absolute best part about creating DIY fabric pants bags is the unlimited potential for personalization and creative expression. Since you are starting with a pre-existing garment, you can lean into the unique features of the original clothing item. For instance, using the waistband of the trousers as the top rim of your bag instantly provides built-in belt loops where you can attach keychains, charms, or colorful scarves.
You can also experiment with mixed-media designs by combining different types of fabric pants to create a striking patchwork look. Alternating between light wash and dark wash denim panels, or mixing corduroy with plain cotton, adds wonderful visual texture and contrast to your bag. Patchwork techniques are highly effective for using up even the smallest scraps of leftover fabric, ensuring zero waste.
Adding embroidery, fabric paint, or iron-on patches is another fantastic way to elevate your fabric pants bags – tutorial project into something truly bespoke. You can stitch delicate floral patterns onto the back pockets or add bold, modern geometric designs across the main panels. This step allows you to tailor the accessory to match your personal wardrobe perfectly or create a thoughtful, customized gift for a friend.
Don’t overlook the interior of your bag when thinking about customization and extra flair. Installing a bright, contrasting lining fabric not only makes it easier to find your keys at the bottom of the bag, but it also adds an unexpected element of joy every time you open it. You can also sew in small interior slip pockets using leftover shirt fabric to keep your pens, lip balm, and phone neatly organized.
For the closure system, you can choose from a variety of creative options depending on your sewing skill level. A simple magnetic snap is incredibly easy to install and provides a secure, hidden closure that doesn’t disrupt the clean lines of your bag. If you want maximum security for a travel bag, learning how to insert a heavy-duty metal zipper along the top edge is a fantastic skill to develop.
Finally, consider modifying the strap style to change how the bag is carried and used daily. You can create a long, adjustable crossbody strap using a slider buckle, or use thick cotton rope fed through metal eyelets for a relaxed, nautical aesthetic. The possibilities are entirely endless, and each choice you make ensures that no two bags will ever look exactly alike.
Yes, you absolutely can assemble these bags by hand using a strong backstitch and heavy-duty thread. While hand-sewing will take considerably longer than using a machine, it allows for a lot of precision and gives your project a beautiful, rustic, artisan look that is highly valued.
Heavyweight cotton fabrics, denim jeans, corduroy trousers, and canvas work pants are ideal because they offer excellent durability and structure. However, lightweight linen or cotton trousers can also be used if you interface them with a fusible stabilizer to give the fabric more body.
Since your bag is made from repurposed clothing, it is generally safe to wash. If you used denim or cotton and included a washable lining, you can machine wash it on a gentle cycle with cold water. It is best to air dry the bag to preserve its shape and prevent any hardware elements from rattling in the dryer.
Not at all. This project is incredibly beginner-friendly because it uses basic straight lines and simple shapes. If you can cut a straight line and sew a basic seam, you can successfully create a gorgeous bag on your very first try.
To prevent the bottom of your bag from sagging when you carry heavy items, you can insert a removable base stabilizer. Simply cut a piece of heavy plastic canvas or thick cardboard to match the dimensions of your boxed bottom, cover it with a scrap of fabric, and place it at the bottom of your bag.
In this fabric pants bags – tutorial, we have explored the entire rewarding journey of transforming old, discarded trousers into stylish, eco-friendly accessories. From gathering your tools and prepping your textiles to mastering the assembly process and adding custom finishes, you now possess all the knowledge required to create your own unique bags.
Upcycling fabric is not just a wonderful way to save money and protect the environment, but it also provides an incredible outlet for your personal creativity.
