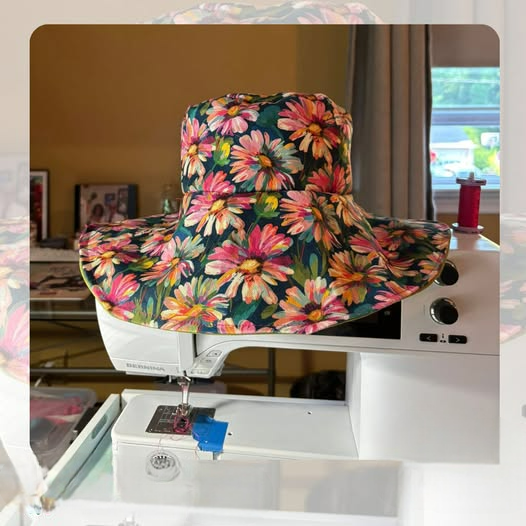
Fabric Hat - Tutorial

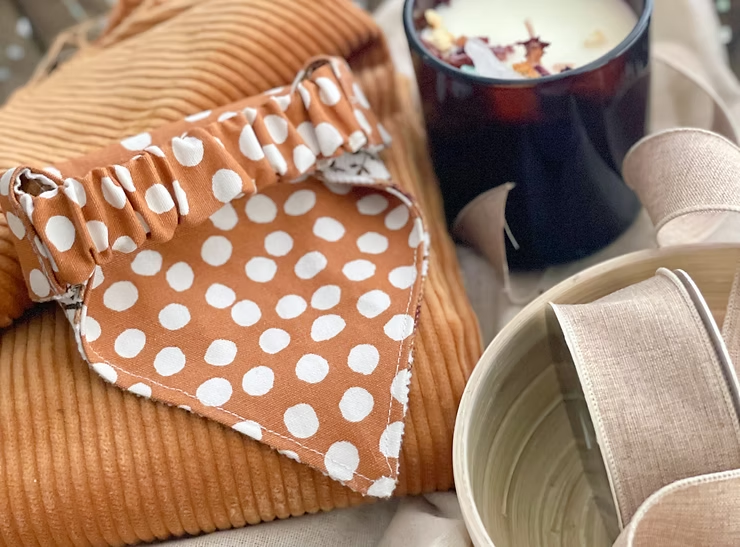
This comprehensive Easy Dog Bandana DIY – Tutorial is designed to guide you through the joyful and straightforward process of creating a custom, stylish accessory for your favorite canine companion. Making your own pet accessories is a wonderful way to express your creativity while ensuring your dog looks absolutely dapper on walks, at the park, or during family photo sessions. By diving into this step-by-step project, you will discover how easy it is to transform simple fabric scraps into a high-quality fashion statement that fits your dog’s unique personality perfectly.
The beauty of a handmade pet project is that it allows you to customize every single detail, from the pattern of the fabric to the type of security closure used. In this practical tutorial, we will explore the absolute best methods for drafting, cutting, and assembling a comfortable, safe neckerchief that does not restrict your pet’s movement or cause overheating. Whether you are a seasoned sewist with a collection of premium fabrics or a complete beginner looking for a fun weekend craft, this project delivers quick results and immense satisfaction.
As you begin working on your Easy Dog Bandana DIY, you will quickly realize that this project is highly addictive because it requires very little time and minimal materials to achieve a boutique-style finish. Choosing the right textile prints can instantly set the mood for different holidays, seasons, or special birthday celebrations for your pup. Gather your crafting supplies, prepare your workstation, and let us dive straight into the essential fabric selections, accurate measurement calculations, and sewing techniques needed to master this lovely pet accessory.
Selecting the correct fabric is the absolute foundation of this project, ensuring that your finished pet garment is both durable and perfectly soft against your dog’s fur. For a successful Easy Dog Bandana DIY – Tutorial, high-quality 100% quilting cotton, lightweight flannel, or breathable linen are the top choices recommended by professional pet accessory designers. Cotton is exceptionally stable to cut and sew, stands up beautifully to repeated trips through the washing machine, and allows your dog’s skin to breathe naturally.
You should generally avoid heavy, rigid textiles such as dense upholstery canvas, thick denim, or stiff synthetic polyesters when crafting your custom neckwear. Heavy fabrics can trap an excessive amount of body heat around your dog’s neck, which can quickly lead to discomfort or dangerous overheating during energetic summer afternoon walks. Stiff materials can also rub uncomfortably against sensitive pet skin, so keeping things lightweight and natural is always the safest path to a happy, tail-wagging pup.
The core tools you will want to assemble on your cutting table for this step-by-step tutorial include a sharp fabric rotary cutter, a clear acrylic quilting ruler, and a self-healing cutting mat. Having a razor-sharp blade ensures you can slice through woven cotton fibers with absolute precision, preventing the edges from fraying heavily before they are hemmed. You will also want to keep a water-soluble fabric marking pen, a collection of straight pins, and a reliable household steam iron nearby.
If you do not own a sewing machine or prefer a quick, kid-friendly craft project, you can easily adapt this entire method using premium iron-on fusible bonding tape. Heavy-duty fusible web tape melts completely under the intense heat of a standard household iron, permanently sealing two layers of fabric together with incredible strength. This brilliant no-sew modification opens up the crafting world to absolute beginners, allowing you to create last-minute holiday pet outfits without threading a single needle.
For those who enjoy the classic machine sewing process, matching your thread color to the primary background color of your fabric will elevate the overall design. A standard universal sewing needle size 80/12 paired with a durable all-purpose polyester thread will yield beautiful, clean seams that do not pucker or pull the fabric. Laying out all your specialized materials before you begin your very first cut ensures a highly efficient, relaxing, and organized crafting experience from start to finish.
Finally, consider sourcing unique fabric prints to build a magnificent year-round wardrobe that covers every changing season and major holiday on your calendar. You can look for spooky pumpkin patterns for autumn, cozy red plaids for winter, bright floral designs for spring, and tropical fruit motifs for summer. Utilizing affordable fabric fat quarters or upcycling old cotton shirts is an eco-friendly and budget-conscious way to collect beautiful patterns while practicing sustainable crafting habits.
Achieving a comfortable and completely safe fit requires taking a precise measurement of your dog’s neck circumference before you begin cutting your beautiful fabric. To start this critical phase of the Easy Dog Bandana DIY – Tutorial, grab a flexible cloth measuring tape and wrap it gently around the widest part of your dog’s neck. Ensure your pet is standing up calmly during this process, as sitting down can cause their neck muscles to bunch up naturally, leading to an inaccurate reading.
The golden rule for any type of pet neckwear is to implement the classic two-finger safety rule to ensure the fabric never pulls tightly against the throat. As you hold the flexible measuring tape around your pup’s neck, slide your index and middle fingers flat underneath the tape to create a comfortable buffer zone. This vital bit of extra breathing room ensures that when the finished Easy Dog Bandana DIY is tied or snapped on, it can rotate freely without restricting breathing.
Once you have noted down your baseline neck measurement, you will need to add a specific amount of extra fabric length depending on your chosen closure style. If you plan to make a traditional tie-on scarf, you must add an extra eight to twelve inches to your baseline number to ensure you have plenty of fabric tails to tie a secure knot. Small toy breeds generally only require six inches of extra tie length, while massive giant breeds will need up to fourteen inches.
If you prefer a sleek over-the-collar style—where the fabric sleeve slips directly onto your dog’s everyday collar—the pattern calculation changes slightly. For this slide-on method, the total width of the top edge should equal roughly half to two-thirds of your dog’s total neck circumference measurement. This targeted coverage ensures the fabric sits beautifully across the chest or back without bunching up awkwardly under the throat or blocking the leash attachment D-ring.
To speed up your future crafting sessions, it is highly beneficial to draw a reusable paper or cardboard template based on your calculated custom dimensions. Draw a perfectly symmetrical right-angle triangle or an elongated pentagon shape onto a sturdy piece of cardstock, marking the top width and the vertical length of the hanging point. Having a physical template on hand ensures that every single accessory you make in the future turns out uniform and balanced.
Take a quick moment to hold your cut paper template against your dog’s chest to visually verify the proportions before cutting into your premium holiday textiles. The lowest point of the triangle should rest gently on the center of the chest, ending well above the dog’s front wrists to prevent them from tripping. Spending a few extra minutes during this careful planning and measurement phase sets you up for absolute success and a perfectly tailored fit.
With your custom measurements completely locked in, you are ready to begin the rewarding assembly phase of this Easy Dog Bandana DIY – Tutorial. Lay your freshly pressed cotton fabric completely flat on your self-healing mat, ensuring the decorated right side faces down if you are drawing lines directly on the textile. Fold your fabric neatly along the bias if you want to create a classic double-layered triangle, or leave it single-layered for a light summer scarf.
Using your clear acrylic ruler and fabric pen, trace your template lines directly onto the wrong side of the prepared cotton material. If you are planning a traditional sewn hem around the raw edges, remember to add an extra half-inch seam allowance all the way around your drawn lines. Carefully guide your rotary cutter along the acrylic edge to slice out your fabric pieces, keeping your non-dominant hand safely behind the safety guard.
If you are constructing a high-quality reversible look, pin your two matching triangle fabric pieces together with their decorated right sides touching directly. This right-sides-together positioning ensures that all your raw fabric edges and thread lines will end up hidden securely on the inside when the project is finished. Leave a small two-inch open gap along one of the flat diagonal sides to allow you to turn the piece right side out later.
Take your pinned fabric duo to your sewing machine and stitch around the perimeter using a sturdy, basic straight stitch and a standard quarter-inch seam allowance. Slow your sewing speed down significantly as you approach the sharp corner points, keeping your machine needle down in the fabric while you lift the presser foot to pivot the piece. This classic pivoting technique guarantees that your completed Easy Dog Bandana DIY features crisp, professional geometric angles.
Before turning the sewn piece right side out, use your sharp fabric scissors to carefully clip away the excess fabric from the three corner tips. Snipping away these tiny corner triangles dramatically reduces the internal bulk of the seam allowances, allowing the finished corners to push out completely sharp and flat. Be extra careful not to snip through your actual thread lines, as this will cause the structural integrity of the corners to fail when washed.
Reach your fingers inside the small open turning gap you left earlier and gently pull the entire fabric structure through the opening, turning it right side out. Use a blunt tool, such as a wooden chopstick or a specialized turning tool, to gently push the corner points out until they are crisp. Take the piece straight to your ironing board, fold the raw edges of the open turning gap neatly inward, and press the entire accessory completely flat.
The final stage of our Easy Dog Bandana DIY – Tutorial involves sealing up your open turning gap and adding the perfect closure system for your pet’s lifestyle. To close up the remaining hole cleanly, topstitch a neat line one-eighth of an inch away from the edge all the way around the entire perimeter of the triangle. This continuous topstitching border not only seals the opening permanently but also gives the accessory a highly polished, boutique-style finish.
If you opted for the practical over-the-collar style, you will now create the open sleeve channel that allows your dog’s regular collar to slide through. Fold the long top edge of your triangle downward by one and a half to two inches, depending on the thickness and buckle size of your pet’s everyday collar. Sew a straight line directly across this folded flap from one side to the other, creating a hollow fabric tunnel to weave the collar through easily.
For those crafting a traditional tie-on Easy Dog Bandana DIY, the long fabric tails you integrated during the measuring phase are already complete and ready to tie. However, if you find that thick knots look a bit too bulky or heavy around your small dog’s neck, you can easily install alternative modern closures. Adding lightweight plastic snaps, heavy-duty hook-and-loop velcro strips, or metal press-studs to the tips offers fantastic security and daily convenience.
Installing plastic resin snaps is an incredibly popular choice among modern crafters because they are quick to apply and release instantly under pressure for safety. Use a specialized snap plier tool to pierce the fabric tips, positioning one cap piece facing forward and the matching piece facing backward so they lock perfectly flush. Plastic snaps eliminate the bulky knot entirely, allowing the neckwear piece to sit completely flat and comfortable against the back of your pup’s neck.
If you choose to use hook-and-loop velcro strips, cut a small one-inch piece and sew it securely onto the overlapping tips of your finished triangle. Velcro offers a fantastic degree of micro-adjustability, allowing you to loosen or tighten the fit slightly if your dog grows a thicker winter coat or gets a fresh summer haircut. Always ensure the soft loop side of the velcro faces toward your dog’s fur to prevent any accidental scratchiness or uncomfortable pulling.
Slide your completed accessory onto your dog’s collar or secure the snaps gently around their neck, checking the fit one final time using the trusted two-finger safety rule. Step back and admire your beautiful handiwork; your pet is now sporting a gorgeous, completely unique, and perfectly fitted custom garment. This successful project stands as a wonderful testament to your crafting precision, ready to make your pup the absolute star of every single daily walk.
The over-the-collar style is widely considered the safest option for highly active dogs that love to run, wrestle, and play in dense brush or doggy daycare. Because the fabric slides directly onto their existing breakaway safety collar, there are no loose fabric tails or heavy knots that could accidentally get caught on branches or fencing during play.
To create an effective cooling pet accessory, construct the project using a highly absorbent, lightweight cotton wrap or light linen fabric. Before heading out on a hot walk, simply soak the finished accessory in cold water, wring out the excess moisture gently, and place it in the freezer for ten minutes before snapping it onto your pup.
Yes, absolutely! You can easily complete this entire project without a single stitch by utilizing heavy-duty iron-on fusible hem tape or high-quality fabric glue. Simply fold your raw edges inward over the adhesive tape, press down firmly with a hot household iron for a few seconds, and you will create a completely permanent, washable bond.
To keep your pet’s custom wardrobe fresh and clean, machine wash the cotton accessories in cold water on a gentle cycle with a pet-safe, hypoallergenic detergent. Air drying flat on a clean towel is highly recommended to prevent the natural cotton fibers from shrinking or warping, followed by a quick press with a warm iron to remove wrinkles.
If your dog’s neck measurement falls perfectly between two sizes, it is always best to size up to ensure absolute comfort and safety. A slightly larger accessory can easily be rolled down along the top edge a couple of rows to shorten the front point, whereas an accessory that is cut too small will look tight and feel restrictive.
In this comprehensive Easy Dog Bandana DIY – Tutorial, we have explored the entire simple process of transforming basic cotton fabrics into a perfectly fitted, stylish, and durable pet accessory. We covered selecting lightweight, breathable natural fibers, implementing the essential two-finger safety rule during measurements, cutting symmetrical triangle patterns, and installing modern snap closures and over-the-collar channels.
By utilizing these foundational crafting and sewing principles, you can confidently build a beautiful, custom-tailored wardrobe that showcases your personal style while keeping your furry companion perfectly safe and comfortable.