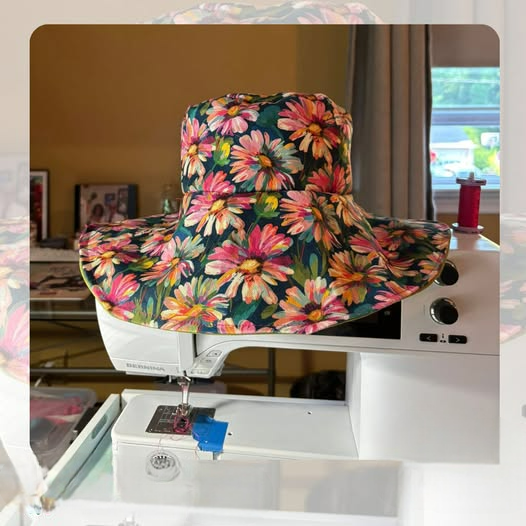
Fabric Hat - Tutorial

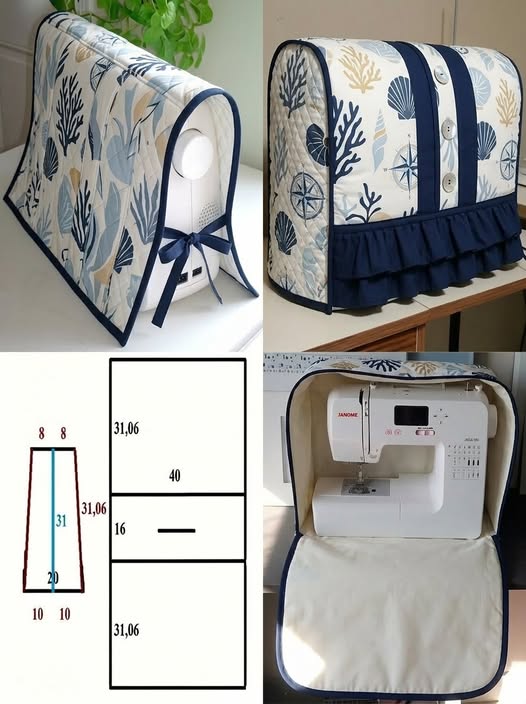
Sewing Machine Cover – Tutorial: If you have ever left your creative space for a few days only to return to a thick layer of dust on your favorite crafting companion, you know exactly why a DIY sewing machine cover is an absolute necessity. Your sewing machine is an investment, a tool of creativity, and honestly, a piece of your heart, so protecting it with a custom fabric cover is the perfect weekend project. In this comprehensive Sewing Machine Cover – Tutorial, we are going to walk through every single step to create a beautiful, durable, and functional shield for your machine that matches your sewing room aesthetic perfectly.
Crafting your own sewing machine dust cover is not just about utility; it is also one of the best beginner sewing projects to practice straight lines, boxing corners, and working with structural interfacings. Instead of buying a generic, poorly fitting plastic alternative, this step-by-step sewing guide allows you to customize dimensions, add handy storage pockets, and express your personal style through unique fabric choices. Whether you own a compact quilting machine or a heavy-duty mechanical beast, tailoring a cover ensures absolute protection from dust, pet hair, and accidental spills.
Before we dive into the actual cutting and stitching, it is important to understand the core elements that make a handmade sewing machine cover both sturdy and beautiful. We will explore how to select the right sewing materials, how to accurately measure your machine for a flawless fit, and the exact construction techniques required to give your cover a professional, crisp look. Grab a cup of coffee, dust off your tape measure, and let’s get ready to dive into this ultimate Sewing Machine Cover – Tutorial designed to elevate your craft room and protect your gear.
Choosing the right sewing supplies is the foundation of any successful project, especially when you want a finished product that stands upright and holds its shape. For a durable fabric machine cover, we highly recommend using medium to heavyweight fabrics such as cotton canvas, denim, or home decor fabrics for the exterior. These sturdier textiles offer natural structure and excellent longevity, ensuring your machine remains safe from external bumps and scratches.
For the interior lining, a high-quality quilting cotton works beautifully because it is smooth, comes in endless patterns, and won’t scratch the delicate plastic or digital screens of your machine. To give the cover that crisp, professional boutique look, you will also need a layer of fusible fleece or heavy interfacing sandwiched between the fabrics. This padding provides the necessary stiffness so the cover doesn’t simply collapse into a sad puddle of cloth when off the machine.
Beyond the textiles, you will need your standard sewing room essentials ready on your cutting table before you begin. Make sure you have a sharp rotary cutter, a self-healing cutting mat, and a long acrylic quilting ruler to ensure perfectly straight cuts and precise angles. A set of high-quality sewing pins or wonder clips will be your best friends for holding the thick, layered panels together without shifting during construction.
Do not forget to select a coordinating, high-quality polyester thread that can handle the stress of multiple thick layers, particularly when sewing the heavy corner seams. You will also want to install a fresh universal sewing needle (size 80/12 or 90/14) into your machine to prevent skipped stitches or fabric puckering. Having a reliable iron and ironing board nearby is also non-negotiable, as frequent pressing is the secret weapon to achieving crisp, flawless edges.
If you want to add functional flair to your project, consider picking up some extra quilt batting scraps or contrasting fabric to create external utility pockets. These pockets are incredibly convenient for stashing your foot pedal, power cords, extra bobbins, and fabric shears right where you can always find them. Gathering all these crafting tools beforehand ensures a smooth, uninterrupted, and enjoyable sewing session from the very first cut to the final stitch.
Ultimately, taking the time to curate beautiful, coordinating fabrics turns a simple utility item into a stunning piece of sewing room decor. You can play with vibrant modern prints, elegant vintage florals, or sleek minimalist solids to reflect your personal style. Once your materials are neatly organized on your workspace, you are officially ready to move on to the most critical step of the process: getting the perfect measurements.
The secret to a truly spectacular custom sewing machine cover lies entirely in the accuracy of your initial measurements, as no two machine models are shaped exactly alike. Standard factory covers are often dangerously tight or awkwardly baggy, which is why a tailored machine sleeve is always superior. To get started, place your machine on a flat surface, make sure the presser foot is down, and remove any detachable extension tables you don’t plan to store inside the cover.
You will need to capture three primary dimensions using a flexible tailor’s measuring tape: the total width, the maximum height, and the deepest depth of the machine. When measuring the width, measure from the outermost edge of the handwheel all the way to the opposite side of the machine’s body. For the height, measure from the tabletop up to the highest point, which is usually the spool pin or the top thread guide.
To find the depth, measure the widest distance from the front face of the machine to the very back, taking into account any protruding knobs or cord ports. Once you have these three exact numbers written down on a piece of scrap paper, it is time to calculate your fabric cutting dimensions. We must add a specific amount of ease and sewing seam allowances to these raw numbers so the cover slips on and off effortlessly.
To calculate the front and back panels, take your machine’s width, add 1.5 inches for ease and seams, and then take the height and add 1 inch. For the side panels, which will wrap around the depth of the machine, take the measured depth and add 1.5 inches, and use the same calculated height. The top panel will tie everything together, requiring a width equal to your machine’s width plus 1.5 inches, and a depth equal to the machine’s depth plus 1.5 inches.
Write these final adjusted calculations down clearly, as they will form the exact blueprint for your DIY sewing pattern. It is always better to have a cover that is a quarter-inch too loose than one that is so tight it engages the handwheel or bends your spool pins. Double-check your math one more time before laying out your fabric, ensuring that you are completely confident in your customized blueprint.
Remember that taking precise measurements now saves an immense amount of frustration and wasted fabric later on in the construction phase. If you happen to have a uniquely shaped computerized machine with an extended arm, feel free to add an extra half-inch of ease for good measure. With your custom numbers locked in, you are ready to cut your fabric panels and begin the exciting assembly process.
Now that your fabric pieces are accurately cut according to your custom measurements, it is time to bring your sewing machine cover to life. Start by prepping your exterior fabric panels by fusing the interfacing or fusible fleece to the wrong side of the cloth using a hot iron. This step is incredibly satisfying, as you will instantly feel the fabric transform from limp sheets into structured, sturdy architectural panels ready for construction.
If you opted to include external storage pockets, now is the absolute best time to construct and attach them to your exterior panels before assembling the main body. Hem the top edge of your pocket piece, press the sides inward, and topstitch it neatly onto the lower section of your front or side panels. This adds immediate functionality to your handmade machine organizer, giving you a dedicated home for your instruction manuals, clips, and marking tools.
Next, place your front exterior panel and one of your side panels right sides together, aligning the vertical side edges carefully. Pin or clip securely along the edge, and stitch using a standard half-inch seam allowance, making sure to backstitch at both the beginning and the end. Repeat this exact process for the back panel and the remaining side panel until you have a continuous, boxy fabric loop that mimics the shape of your machine.
To attach the top panel, pin it right sides together with the top edges of your newly formed fabric loop, matching up the corners perfectly. Sew slowly around all four sides of the top rectangle, pivoting carefully at each corner with your needle down to maintain a crisp, sharp box shape. Once stitched, press these bulky seams open or toward the sides to reduce bulk, and turn the entire exterior shell right side out to admire your progress.
Repeat this entire assembly process exactly the same way using your interior lining fabric, but leave a generous 5-inch opening along one of the vertical side seams. This unsewn opening is crucial, as it acts as the birthing window that will allow you to turn the entire fully lined cover right side out later. You should now have two separate box shapes: a structured exterior shell turned right side out, and a soft lining shell kept wrong side out.
Slip the exterior shell inside the lining shell so that their right sides are facing each other, aligning the raw bottom raw edges and side seams perfectly. Stitch completely around the entire bottom circumference using your trusted seam allowance, ensuring all layers are secured. Reach through the opening you left in the lining, gently pull the exterior fabric through, press the bottom edge flat, topstitch the opening closed, and tuck the lining neatly inside.
Congratulations, the main structure of your cover is complete, but you can take it to the next level with a few clever sewing customizations. One incredibly popular addition to a functional sewing cover is creating a neat, reinforced slit or opening at the very top for the machine’s carrying handle. To do this, simply sew a large, oversized buttonhole or a faced opening on the top panel before assembly, allowing you to carry your machine easily without removing its protection.
Another fantastic way to elevate the aesthetic of your project is by adding decorative topstitching or contrast piping along the top and side seams. Running a neat line of stitching an eighth of an inch away from the structural seams adds a beautiful, high-end tailored finish to the edges. You can also experiment with patchwork quilting techniques for the exterior panels, using up precious fabric scraps to create a vibrant, mosaic-style cover.
If you want to ensure your cover remains absolutely pristine over years of heavy use in a busy craft room, fabric selection and care are key. If you used high-quality cotton canvas and quilting cotton, your finished item is fully machine washable on a gentle, cool cycle. Always line dry your cover instead of throwing it in a hot dryer to prevent the internal fusible interfacing from crinkling or warping over time.
For an extra layer of utility, you can attach small Velcro tabs or magnetic snaps to the top edges of your external pockets to keep your tools secure. Some sewists even like to add a heavy denim or vinyl base panel to the very bottom of the cover to protect it from dark tabletops or grease. The beauty of DIY sewing tutorials is that you are the ultimate designer, with complete freedom to tweak every detail to fit your exact workflow.
If you are gifting this cover to a fellow crafter, consider using a fabric marker or an embroidery machine to add a personalized monogram or a witty sewing quote. A beautifully executed cover makes a deeply thoughtful, practical gift that any textile artist, quilter, or casual hobbyist will cherish daily. It showcases your skills while simultaneously celebrating and protecting the wonderful craft that brings so much joy to your creative life.
Now that your beautiful cover is sitting proudly on your machine, your entire sewing space will instantly feel more organized, cohesive, and intentional. No more unsightly cords hanging out, no more dust settling into tension discs, just a clean, inspiring environment ready for your next big project. Take a step back, snap a few photos of your beautiful creation, and enjoy the peace of mind that comes with a well-protected machine.
What is the best fabric to use for a sewing machine cover?
The best exterior fabrics are medium to heavyweight woven materials like cotton canvas, denim, duck cloth, or upholstery fabric because they offer excellent structure and durability. For the lining, smooth quilting cotton is ideal because it is soft, gentle on your machine’s surface, and easy to wash.
Do I absolutely need to use interfacing or fleece for this project?
While you can make a cover without it, using a fusible fleece or heavy interfacing is highly recommended if you want the cover to stand upright on its own. Without interfacing, the cover will look loose, saggy, and wrinkle easily, losing that crisp, professional box shape.
Can I make this tutorial work for a serger or overlocker machine?
Yes, absolutely! This exact step-by-step sewing guide applies to sergers, overlockers, and even embroidery machines. You just need to take accurate measurements of your specific machine’s unique dimensions and apply the exact same formula for adding ease and seam allowances.
How do I clean my handmade fabric sewing machine cover?
If you constructed your cover using pre-washed cotton fabrics and high-quality sewing interfacings, you can safely wash it in cold water on a gentle cycle. To maintain its shape and prevent the interfacing from degrading, reshape the cover while damp and let it air dry completely before pressing it with a warm iron.
How much ease should I add so the cover isn’t too tight?
Adding 1.5 inches total to your raw width and depth measurements provides the perfect amount of wiggle room (ease) along with standard half-inch seam allowances. This ensures the finished cover slips over the machine smoothly without catching on any levers or tension knobs.
In this Sewing Machine Cover – Tutorial, we have covered everything you need to create a beautiful, custom-fitted, and highly protective shield for your favorite creative tool.
From choosing robust sewing materials and calculating exact dimensions with proper ease, to assembling the panels and adding functional lining, you now possess the skills to elevate your craft room organization. This project is a wonderful testament to how utility and personal style can blend seamlessly together through the art of sewing.