Fabric Hat - Tutorial

A Double Fabric Oven Mitt – Tutorial is the perfect project for anyone looking to combine kitchen safety with a touch of personalized home decor. Many home cooks struggle with store-bought mitts that are either too thin or wear out quickly, but creating your own heat-resistant kitchen gear allows you to control the quality of the materials used. By following this step-by-step sewing guide, you will learn how to layer fabrics effectively to protect your hands from high temperatures while adding a pop of color to your cooking space.
This Double Fabric Oven Mitt – Tutorial focuses on the importance of using 100% cotton fabrics and specialized insulated batting to ensure maximum heat protection. When you work with double-layered fabric, you significantly increase the durability of the mitt, making it a long-lasting staple in your culinary adventures. Whether you are a beginner or an experienced sewist, mastering this DIY oven mitt project will provide you with a functional tool that is far superior to mass-produced alternatives found in big-box stores.
In this comprehensive Double Fabric Oven Mitt – Tutorial, we will cover everything from selecting the right high-quality textiles to the final finishing stitches that give your project a professional look. We will emphasize SEO-friendly sewing techniques that help your handmade items stand out, ensuring that your finished mitt is both a work of art and a reliable safety device. Let’s dive into the details of creating your very own custom kitchen accessories through this detailed and easy-to-follow instructional article.
The foundation of a successful Double Fabric Oven Mitt – Tutorial begins with selecting the right heat-resistant materials. You must prioritize natural fibers like cotton because synthetic materials, such as polyester, can melt when they come into contact with hot pans or oven racks. Choosing a vibrant outer decorative fabric allows you to match your kitchen’s aesthetic while maintaining a high level of safety.
Inside your mitt, the insulated lining is the most critical component for preventing burns during your daily cooking. Many experts recommend using Insul-Bright or a similar heat-reflective batting in addition to a layer of cotton flannel. This combination ensures that the heat from a hot baking sheet does not transfer through the layers to your skin, providing peace of time and safety.
For the inner lining fabric, comfort is key, so choosing a soft but durable quilt-grade cotton is highly recommended. You want a fabric that feels good against your hand but is strong enough to withstand the friction of frequent use. This Double Fabric Oven Mitt – Tutorial emphasizes that the quality of your sewing supplies directly impacts the lifespan of your finished kitchen project.
Don’t forget about your sewing notions, such as heavy-duty thread and sharp fabric shears. Using a universal sewing needle or a slightly thicker denim needle can help your machine glide through the multiple layers of the double fabric construction. Having the right tools on hand makes the process smoother and ensures that your handmade oven mitt looks professional and polished.
Preparation also involves pre-washing your fabrics to prevent any future fabric shrinkage after the mitt is completed. Since kitchen items require frequent washing due to food spills, ensuring the fabric stability beforehand is a vital step in this Double Fabric Oven Mitt – Tutorial. This simple preparation step keeps your mitt perfectly sized even after dozens of cycles through the laundry.
Lastly, consider the aesthetic coordination of your project by choosing a contrasting bias tape for the cuff. This small detail adds a high-end touch to the DIY kitchen craft and allows for further personalization. By selecting the best textile combinations, you are setting yourself up for success in creating a beautiful and functional piece of quilted kitchenware.
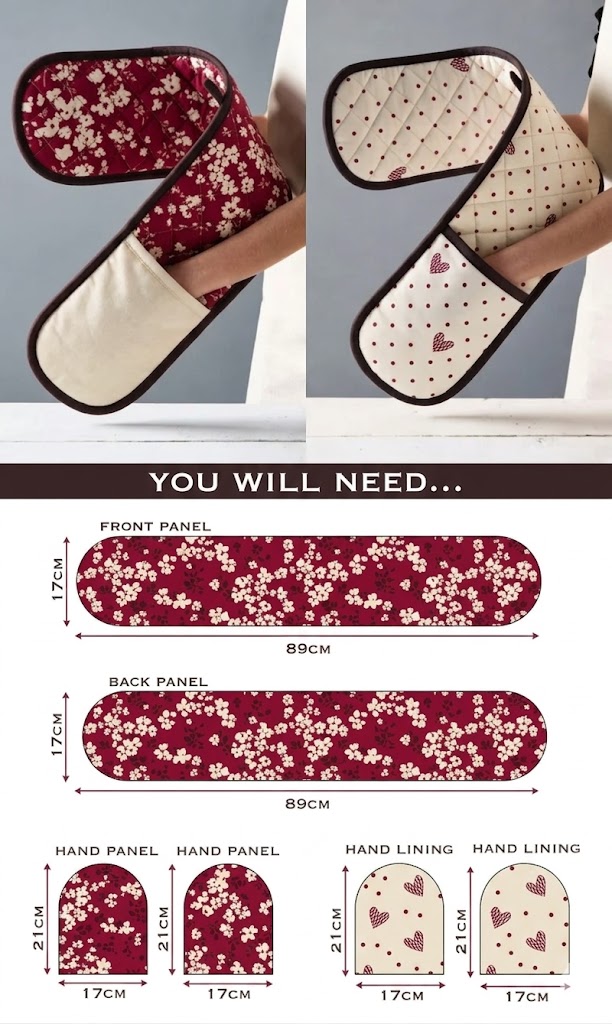
The core of this Double Fabric Oven Mitt – Tutorial involves the precise layering of your chosen materials to create a protective thermal barrier. You will start by cutting your pattern pieces from the outer fabric, the lining fabric, and at least two layers of insulated batting. Keeping your pattern alignment consistent ensures that the mitt fits comfortably on either the left or right hand.
Once your pieces are cut, the next step in our Double Fabric Oven Mitt – Tutorial is to quilt the layers together. This process involves sewing a diamond grid pattern or simple straight lines through the fabric and batting to prevent the internal layers from shifting. This quilting technique is essential for maintaining the structural integrity of the handmade heat protector.
Pinning the layers correctly is vital to avoid bunching as you move the project through your sewing machine. Use sewing clips or sturdy pins to hold the thick layers of the Double Fabric Oven Mitt – Tutorial project in place. Because you are working with multiple thicknesses, taking your time during the fabric assembly phase will prevent errors and uneven seams.
As you begin to sew the perimeter, remember to leave a wide enough seam allowance to accommodate the bulk of the batting. This Double Fabric Oven Mitt – Tutorial suggests a half-inch allowance to ensure that the stitches catch every layer securely. Using a walking foot attachment on your machine can be incredibly helpful for feeding the thick quilted fabric through evenly without stretching.
Carefully navigating the curves, especially around the thumb area, is a hallmark of a well-made custom oven mitt. You may need to clip the curves—making small snips in the seam allowance—to allow the fabric to lay flat once it is turned right-side out. This sewing tip is a crucial part of the Double Fabric Oven Mitt – Tutorial for achieving a smooth, professional silhouette.
The final assembly step involves turning the mitt through the opening at the bottom and pressing it with a steam iron. A good press helps define the shape of your DIY oven mitt and prepares the edge for the application of the decorative binding. This attention to detail is what separates a basic project from a high-quality tutorial-based sewing craft.
To ensure your project from this Double Fabric Oven Mitt – Tutorial lasts for years, you should consider incorporating reinforced stitching at high-stress points. The area between the thumb and the fingers often experiences the most wear and tear when gripping heavy cast-iron skillets. Adding extra backstitching in this area significantly improves the longevity of the mitt.
Another advanced feature to include in your Double Fabric Oven Mitt – Tutorial is a hanging loop. A simple strip of matching fabric or a piece of twill tape sewn into the side seam allows you to display your work and keep it within reach. This functional addition is a favorite among home organization enthusiasts and adds a “boutique” feel to your gift-ready project.
Safety is the top priority, so always test the heat resistance of your completed mitt before using it with extremely hot items. This Double Fabric Oven Mitt – Tutorial recommends starting with warm plates to ensure the insulation is positioned correctly. Understanding the limits of your thermal fabrics is part of being a responsible and skilled DIY crafter.
For those who want to take the Double Fabric Oven Mitt – Tutorial even further, consider adding a non-slip grip to the palm area. You can find specialized silicone fabric or use “puffy” fabric paint to create a textured surface that prevents dishes from sliding. This safety enhancement makes your handmade mitt even more reliable than many commercial versions.
Maintaining your mitt is just as important as making it, so this Double Fabric Oven Mitt – Tutorial advises on proper laundry care. Always wash your quilted cotton mitts on a gentle cycle and avoid high-heat drying, which can damage the metallic fibers in some insulated battings. Proper care ensures that the protective qualities of the fabric remain intact over time.
Finally, consider the versatility of the Double Fabric Oven Mitt – Tutorial by making a matching set of pot holders or a casserole carrier. Using a consistent fabric theme creates a cohesive look in your kitchen that is both inviting and professional. Expanding on these sewing skills allows you to build a complete library of handmade kitchen textiles.
One of the best parts of following this Double Fabric Oven Mitt – Tutorial is the ability to customize every detail for friends and family. A personalized oven mitt makes an incredible gift for weddings, housewarmings, or holidays. You can use embroidery techniques to add names or fun kitchen-related quotes to the cuff of the customized mitt.
Choosing seasonal fabric patterns is another way to make your Double Fabric Oven Mitt – Tutorial projects stand out. Imagine creating a set of mitts with holiday prints for Christmas or bright floral motifs for a spring kitchen refresh. These seasonal crafts are popular on social media and can even be a great way to start a small handmade business.
If you are working with fabric scraps, this Double Fabric Oven Mitt – Tutorial is a fantastic way to practice sustainable sewing. You can use patchwork techniques to create the outer layer, combining different colors and patterns into a unique, eco-friendly kitchen tool. This approach not only saves money but also reduces waste in your sewing room.
For a more modern look, try using minimalist fabric designs or solid colors with bold, contrasting topstitching. This aesthetic variation of the Double Fabric Oven Mitt – Tutorial appeals to those who prefer a clean, contemporary kitchen style. Experimenting with thread colors can completely change the vibe of the project without changing the basic construction.
Teaching others the steps in this Double Fabric Oven Mitt – Tutorial is also a rewarding experience. Whether you are hosting a sewing circle or sharing your progress online, the clear structure of this DIY guide makes it easy for others to follow along. Sharing the joy of handmade creation is a core value of the global crafting community.
As you conclude your project, take a moment to appreciate the functional art you have created. This Double Fabric Oven Mitt – Tutorial is more than just a set of instructions; it is an invitation to explore your creativity while making something genuinely useful. We hope this comprehensive sewing article inspires you to keep creating and improving your textile skills.
FAQ: Common Questions About the Double Fabric Oven Mitt – Tutorial
What is the best fabric for an oven mitt?
The best fabric for any Double Fabric Oven Mitt – Tutorial is 100% cotton. Avoid synthetic blends, as they can melt under high heat. Cotton canvas or denim are excellent choices for the outer layer due to their durability.
Can I use regular polyester batting?
It is not recommended to use standard polyester batting alone. For a safe Double Fabric Oven Mitt – Tutorial, you should use insulated batting like Insul-Bright, which contains a metalized film to reflect heat, often combined with a layer of cotton batting.
How many layers of fabric do I need?
A standard Double Fabric Oven Mitt – Tutorial uses four main layers of fabric: the outer decorative fabric, two layers of batting/insulation, and the inner lining fabric. This ensures a thick thermal barrier.
Is this project suitable for beginners?
Yes, this Double Fabric Oven Mitt – Tutorial is a great beginner project. It involves straight seams and basic curves, making it an ideal way to practice quilting and working with multiple fabric layers.
How do I clean my handmade oven mitt?
Most items made using this Double Fabric Oven Mitt – Tutorial can be machine washed. Use a cool or warm setting and air dry or tumble dry on low to preserve the insulation layers and prevent the cotton from shrinking excessively.
Conclusion
In this Double Fabric Oven Mitt – Tutorial, we have explored the essential steps to creating a high-quality, heat-resistant kitchen accessory. From selecting the proper 100% cotton fabrics and insulated batting to mastering the quilting techniques required for durability, you now have the knowledge to sew a professional-grade mitt.
We discussed the importance of seam allowances, reinforcing high-stress areas, and even how to customize your projects for gifts or sustainable crafting. Making your own DIY oven mitt not only saves money but ensures that you have a tool specifically designed for your safety and style.

