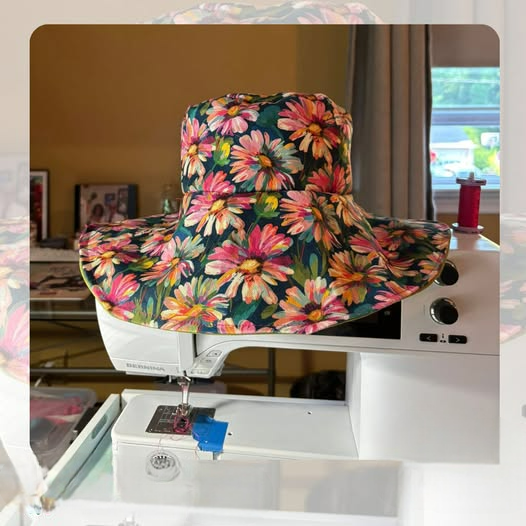
Fabric Hat - Tutorial

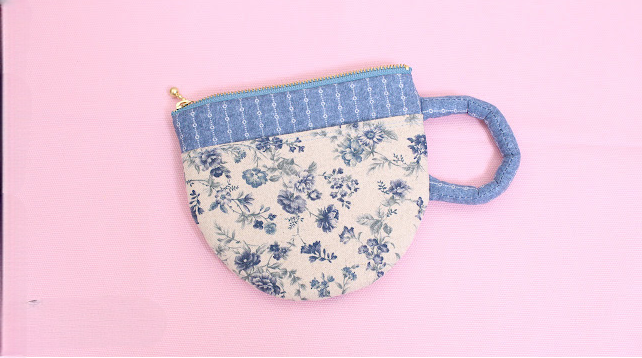
Teacup Pouch Bag Fabric – Tutorial is the perfect project for crafters looking to combine functionality with an adorable, vintage-inspired aesthetic. If you have been searching for a delightful way to store your small trinkets, tea bags, or sewing notions, creating a teacup pouch bag fabric tutorial project is the ultimate solution. This charming little pouch shapes up to look just like a classic teacup, making it an incredibly popular choice for gifts, craft fairs, and personal use. Crafting your own fabric bags allows you to express your unique style while mastering basic sewing skills that you can apply to future endeavors.
The beauty of diving into a teacup pouch bag fabric tutorial lies in its versatility and the joy of working with small fabric scraps. This project is highly accessible for beginners, yet it offers enough creative freedom to keep experienced sewists thoroughly engaged. You do not need a massive workspace or expensive machinery to get started; a basic sewing setup, some beautiful cotton prints, and a bit of enthusiasm are all it takes. By making this pouch, you will learn how to handle curved seams, work with structural interfacings, and install simple closures that give your finished piece a highly professional look.
In this comprehensive guide, we will walk you through every single step required to bring your own teacup pouch bag fabric tutorial to life with ease. From selecting the perfect coordinating fabrics to assembling the intricate teacup shape, every phase of the process is broken down to ensure your success. We will also share valuable insider tips on how to achieve crisp edges and maintain clean lines throughout your construction. Grab your favorite fabric scissors, fire up your sewing machine, and let us explore the wonderful world of whimsical fabric crafting together.
Before you begin sewing your teacup pouch bag fabric tutorial masterpiece, gathering the correct supplies is absolutely crucial for a smooth crafting experience. The choice of your teacup pouch bag fabric will ultimately determine both the durability and the visual appeal of your finished pouch. We highly recommend using 100% quilting cotton because it holds its shape beautifully and comes in an endless array of stunning prints. You will want to select two contrasting fabrics: one for the exterior teacup body and another for the interior lining to create a gorgeous contrast.
In addition to your main textiles, choosing the right structural support is a vital step you cannot overlook. A lightweight fusible interfacing is highly recommended to give your teacup pouch bag fabric the body it needs to stand upright like a real cup. Without interfacing, your pouch might look saggy and lose the defined shape that makes it so uniquely charming. You can also use a thin sew-in fleece if you prefer a softer, slightly padded texture for your finished project.
Beyond the textiles, you will need a few standard sewing notions that you likely already have in your craft room. A sharp pair of fabric shears, a rotary cutter, an acrylic ruler, and a self-healing cutting mat will ensure your fabric pieces are cut with absolute precision. High-quality sewing thread that matches your exterior fabric will help your stitches blend in seamlessly. Do not forget a reliable fabric marker or tailor’s chalk to transfer your pattern markings accurately onto the material.
The closure mechanism is another element where you can let your personal creativity shine through beautifully. Many crafters prefer using a delicate drawstring cord, while others opt for a small zipper or a magnetic snap closure. For this specific teacup pouch bag fabric tutorial, a drawstring closure using satin ribbon or cotton twine works wonderfully to mimic the look of a steaming cup of tea. Make sure to have your chosen closure method ready before you start assembling the pieces.
An iron and an ironing board are absolutely non-negotiable tools when it comes to achieving professional-grade sewing results. Pressing your seams at every single stage of the process ensures that your teacup pouch bag fabric lays perfectly flat and crisp. Ironing also helps to permanently fuse your interfacing to the fabric, preventing any unsightly bubbling or shifting later on. Never skip the pressing steps, as they truly make a world of difference in the final product.
Lastly, having a few handy gadgets like sewing clips or fine pins will keep your fabric layers securely aligned as you sew. A chopstick or a turning tool is also incredibly helpful for poking out the curved edges of your teacup without poking a hole through the fabric. Once you have all these essential tools laid out neatly on your workspace, you are fully prepared to dive into the cutting phase of this exciting project.
Accurate cutting is the absolute foundation of any successful teacup pouch bag fabric tutorial creation. To begin, you will need to download or draw your teacup-shaped template, ensuring it includes the main cup body and the optional saucer base. Lay your pressed exterior teacup pouch bag fabric flat on your cutting mat, ensuring there are no wrinkles or folds. Carefully pin your template to the fabric, paying close attention to the direction of any directional prints you might be using.
Using your sharp rotary cutter or scissors, cut out two identical pieces for the exterior of the cup from your main fabric. Repeat this exact same process with your lining fabric so that you have two matching interior pieces ready to go. If your design includes a fabric handle to mimic a real teacup handle, cut a small rectangular strip of fabric measuring roughly two inches wide by four inches long. Precision during this stage prevents alignment issues when you move over to your sewing machine.
Next, it is time to cut your fusible interfacing using the exact same template pieces you just used for your fabric. You will need two pieces of interfacing for the exterior cup to provide the necessary structure and durability. Some crafters also like to interface the lining pieces if they are using exceptionally lightweight cotton fabrics. Cut the interfacing slightly smaller than the fabric pieces if you want to reduce bulk in your seam allowances.
Once all your pieces are cut, head over to your ironing board to fuse the interfacing to the wrong side of your exterior fabric. Position the textured, glue-coated side of the interfacing against the back of your teacup pouch bag fabric pieces. Press down firmly with a hot, dry iron for several seconds without sliding it around, allowing the adhesive to melt and bond completely. Let the fabric pieces cool down completely before handling them to ensure a strong, permanent bond.
If you are incorporating a handle into your teacup pouch bag fabric tutorial design, prepare it now by folding the fabric strip in half lengthwise, wrong sides together, and pressing it. Open the strip up, fold the raw edges inward toward the center crease, and press the entire strip flat again. Fold the entire piece in half one last time and topstitch along both long edges to create a sturdy, clean handle. Set this piece aside safely as it will be inserted during the main assembly phase.
Take a moment to review all your prepared pieces and ensure that everything is organized and neatly stacked by your machine. Double-check that your sewing machine is threaded correctly with a fresh needle appropriate for medium-weight woven cotton fabrics. Taking these careful preparatory steps ensures that your assembly process will be completely stress-free and highly enjoyable. Now, you are ready to watch your beautiful fabric pieces transform into a stunning three-dimensional teacup pouch.
Now comes the most exciting part of our teacup pouch bag fabric tutorial where your project finally starts taking shape. Begin by placing your two exterior fabric pieces right sides together, aligning all the curved outer edges perfectly. If you are adding a handle, sandwich it between the two layers on one side, keeping the raw edges of the handle aligned with the raw edges of the cup. Pin or clip the pieces securely around the sides and the bottom curve to prevent any shifting.
Take your pieces to the sewing machine and stitch around the sides and bottom using a standard one-quarter-inch seam allowance. Be sure to backstitch at the beginning and the end of your stitching line to secure your threads properly. As you sew around the curved base of the teacup, guide the fabric slowly and smoothly to maintain an even seam. Maintaining a consistent seam allowance is vital for achieving a perfectly symmetrical pouch shape.
To ensure that your curves lay flat and smooth once the pouch is turned right side out, you need to clip the seam allowances. Use your fabric scissors to make small, V-shaped notches along the curved bottom edge of your stitched teacup pouch bag fabric. Be incredibly careful not to snip through your actual line of stitching as you do this. Clipping removes excess fabric bulk, allowing the curves to expand beautifully without bunching up inside.
Next, repeat the exact same sewing process for your two lining fabric pieces, placing them right sides together and stitching the sides and bottom. However, there is one crucial difference: you must leave a three-inch opening unstitched along the bottom edge of the lining. This opening is absolutely essential because it will allow you to turn the entire pouch right side out later on. Clip the curves of your lining pieces just like you did for the exterior pieces.
Now turn your exterior teacup piece right side out, using your turning tool or chopstick to gently push out the curved bottom seams until they are completely smooth. Keep your lining piece wrong side out, and slide the right-out exterior piece completely inside the lining piece. The right sides of your exterior fabric and your lining fabric should now be touching each other face-to-face. Align the top raw edges and the side seams of both the exterior and lining perfectly, securing them with clips.
Stitch completely around the top circular rim of your teacup pouch, using your sewing machine’s free arm if it has one available. Sew slowly and carefully, ensuring that all layers remain perfectly aligned and flat under the presser foot. Once the top rim is fully stitched, reach inside the unstitched opening in the lining and carefully pull the exterior fabric through. Your teacup pouch bag fabric tutorial project is now almost complete, looking more like a real pouch every minute.
With your pouch turned right side out, gently push the lining down into the exterior teacup body using your fingers. Use your iron to press the top rim of the pouch carefully, ensuring that the lining does not peek out above the exterior fabric. Once the top edge is perfectly pressed, topstitch around the rim about one-eighth of an inch from the edge. This topstitching looks highly professional and keeps the lining securely in place during daily use.
Do not forget to close the opening that you left in the bottom of your lining fabric. Pull the lining back out slightly, tuck the raw edges of the opening inward by a quarter of an inch, and press flat. You can easily stitch this opening closed using your sewing machine close to the edge, or sew it by hand using a blind stitch for an invisible finish. Once closed, tuck the lining back inside the cup and give the entire pouch one final, thorough press with your iron.
To create the drawstring casing for your teacup pouch bag fabric tutorial closure, stitch another line parallel to your topstitching, about half an inch down. If you prefer a simpler closure, you can easily install a metal snap or a magnetic button inside the rim. For the drawstring method, make a tiny opening in the outer layer seam, thread your ribbon through using a safety pin, and tie the ends. This drawstring mechanism pulls the top together beautifully, mimicking the classic shape of gathered fabric.
If you want to take your teacup pouch bag fabric project to the next level, consider adding a fabric saucer to the base. You can sew a simple fabric circle with interfacing and attach it directly to the bottom of your teacup pouch. This gives the pouch a stable base to sit on and enhances the realistic teacup illusion tremendously. It is a fantastic way to use up extra scraps of your coordinating lining fabric.
Embellishments offer another wonderful opportunity to personalize your whimsical pouch and make it truly unique. You can hand-embroider delicate floral patterns onto the exterior fabric before assembly, or sew on vintage buttons and lace trim along the rim. Adding a small fabric “tea tag” attached to the drawstring cord is another incredibly clever detail that never fails to delight people. Let your creativity guide you as you add these finishing touches.
Your stunning teacup pouch is now fully complete and ready to be used or gifted to someone special. These pouches are ideal for holding jewelry, tech accessories, sewing clips, or even actual wrapped tea bags for an elegant gift set. Now that you have mastered this teacup pouch bag fabric tutorial, you can easily mass-produce them in various colorways. They are a joyful, satisfying sew that brings a touch of handmade magic to your daily routine.
What is the best fabric to use for a teacup pouch bag?
The best material for this project is 100% premium quilting cotton. It is incredibly easy to cut, sew, and press, making it perfect for handling the small curves of the pouch. You can also experiment with linen or lightweight canvas for a different texture, but cotton offers the best results for beginners.
Do I absolutely need to use interfacing for this project?
Yes, using interfacing is highly recommended if you want your teacup pouch to hold its shape. Without interfacing, the fabric will be too soft and collapse, losing the distinctive teacup appearance. A lightweight or medium-weight fusible interfacing adds the perfect amount of structure.
Can I sew this teacup pouch completely by hand?
Absolutely! While using a sewing machine is much faster, you can easily complete this entire tutorial using basic hand stitches like the backstitch for seams and the ladder stitch for closing the lining. It is a wonderful, portable project to work on by hand.
How long does it take to complete one teacup pouch?
For an intermediate sewist, one pouch usually takes around 45 minutes to an hour from cutting to final pressing. If you are a beginner, it might take you a bit longer as you learn to navigate the curved seams, but it remains a quick and highly rewarding project.
Is this sewing pattern suitable for absolute beginners?
Yes, this project is very beginner-friendly. It introduces essential sewing concepts like sewing curves, applying fusible interfacing, and creating a lining. Following the steps slowly will help any beginner achieve a beautiful result.
How can I clean my fabric teacup pouch bag if it gets dirty?
If you used standard quilting cotton and fusible interfacing, you can gently hand wash the pouch in cold water with mild detergent. Reshape it while damp and let it air dry completely, then give it a quick press with an iron to make it look brand new again.
In conclusion, this teacup pouch bag fabric tutorial provides an enjoyable and practical way to elevate your sewing skills while creating an incredibly charming accessory. Throughout this guide, we covered everything from selecting high-quality quilting cottons and applying essential structural interfacing to cutting precise patterns and mastering curved assembly.
We also explored how to install functional closures and add unique, creative embellishments like fabric saucers and embroidered details to make your project truly stand out.