
Crochet Flower - Tutorial

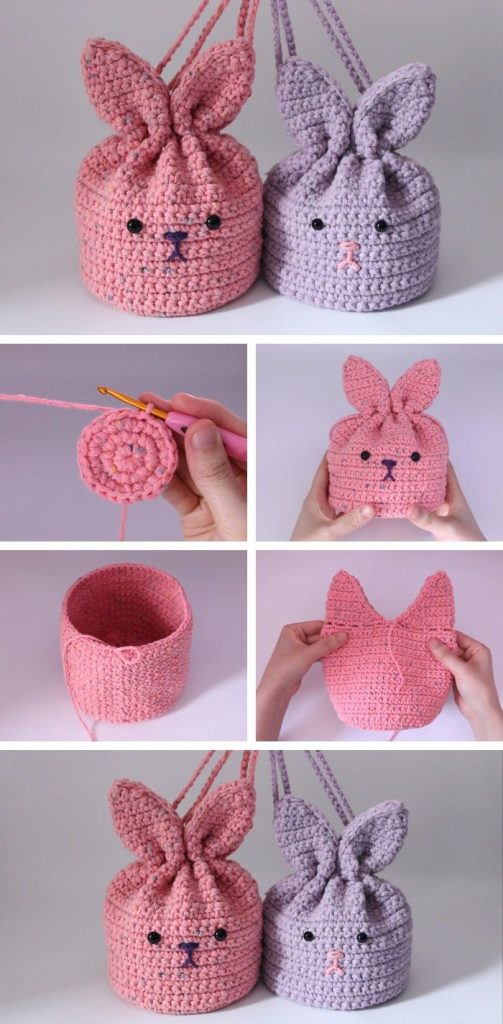
This Crochet Bunny Pouch Tutorial – Pattern is designed to help you create a charming and functional accessory that is perfect for gifting or personal use. Whether you are looking for a whimsical way to store small treasures or a unique handmade gift for a baby shower or Easter, this guide covers everything you need to know. Crocheting is more than just a hobby; it is a therapeutic journey that allows you to transform a simple ball of yarn into a character-filled masterpiece.
Starting your Crochet Bunny Pouch journey requires a blend of basic stitches and a bit of imagination to bring the bunny’s personality to life. The beauty of a handmade Pattern lies in its versatility, allowing you to choose soft pastels, vibrant neons, or classic neutrals to suit any aesthetic. As we dive into this tutorial, you will find that the construction is straightforward enough for beginners while remaining engaging for seasoned crafters who enjoy detail work and assembly.
In this comprehensive guide, we will explore the essential materials, the step-by-step logic of the Crochet Bunny Pouch, and how to interpret a professional Pattern to ensure your project looks polished. By focusing on tension, yarn selection, and stitch consistency, you can create a durable and adorable pouch that will last for years. Let’s gather our hooks and yarn as we embark on this creative adventure to craft the ultimate bunny-themed accessory.
Selecting the right yarn is the foundation of a successful Crochet Bunny Pouch. For this specific Pattern, I highly recommend using a medium-weight cotton or a high-quality acrylic blend to ensure the pouch holds its shape while remaining soft to the touch. Cotton yarn is particularly excellent for items that will be handled frequently, as it offers great stitch definition and is easy to wash without losing its structural integrity.
The size of your crochet hook plays a vital role in the final dimensions of your Crochet Bunny Pouch. Usually, a 3.5mm or 4.0mm hook works best with worsted weight yarn to create a tight fabric that prevents small items from slipping through the stitches. Always check your Pattern gauge beforehand, as a hook that is too large might result in a floppy bunny, while one too small could make the pouch overly stiff and difficult to open.
Beyond yarn and hooks, you will need a few haberdashery essentials to finish your Crochet Bunny Pouch. A sharp pair of scissors and a large-eyed tapestry needle are non-negotiable for weaving in ends and sewing on the bunny ears and facial features. Since this Pattern involves assembly, having these tools ready will make the finishing process much smoother and more professional in appearance.
Safety eyes or embroidery floss are used to give your Crochet Bunny Pouch its cute expression. If you are making this item for a small child, I strongly suggest embroidering the eyes using a satin stitch to avoid any choking hazards associated with plastic safety eyes. This Pattern is flexible, so feel free to experiment with different facial expressions, from sleepy eyes to a bright, wide-eyed look.
Stitch markers are your best friend when working on a circular Pattern like this one. Since the Crochet Bunny Pouch is often worked in continuous rounds, it is easy to lose track of where a row starts and ends. Placing a marker in the first stitch of each round ensures that your bunny stays symmetrical and that the shaping of the pouch remains consistent throughout the project.
Lastly, consider adding a lining or a drawstring to your Crochet Bunny Pouch. While the Pattern creates a solid fabric, a fabric lining can add a touch of luxury and extra security for tiny items like jewelry or coins. A simple cotton cord or a crocheted chain can serve as the closure, ensuring that your bunny stays closed and your belongings remain safe inside.
The core of the Crochet Bunny Pouch usually begins with a “Magic Ring” or “Magic Circle.” This technique is essential for a clean, professional Pattern because it allows you to pull the center tight, leaving no hole at the bottom of your pouch. Mastering the magic ring is a rite of passage for many crocheters, and it serves as the perfect starting point for any circular or 3D project.
Most of the body of your Crochet Bunny Pouch will be constructed using the Single Crochet (sc) stitch. In many parts of the world, this is known as the Double Crochet in UK terminology, so always check which standard your Pattern is using. Single crochet creates a dense, sturdy fabric that is ideal for pouches because it provides a solid barrier that keeps the contents secure and the shape intact.
Increases and decreases are the “sculpting” tools of your Crochet Bunny Pouch. By adding two stitches into one (increasing), you expand the circumference of the pouch, and by joining two stitches together (decreasing), you can taper the top or shape the ears. A well-written Pattern will clearly indicate where these shifts occur to ensure the bunny has a plump, rounded appearance that is synonymous with cuteness.
Working in the back loops only (BLO) is a technique often found in a Crochet Bunny Pouch to create ridges or a flat base. This simple variation of the standard stitch adds texture and depth to your Pattern without requiring complex maneuvers. It is an excellent way to transition from the bottom of the pouch to the sides, giving the item a more “bucket” like shape that stands up on its own.
Slip stitches (sl st) are used in this Pattern primarily for joining rounds or finishing edges. While they don’t add much height, they are crucial for creating a smooth, level top edge on your Crochet Bunny Pouch. They are also used to move your yarn to a different position on the piece without adding bulk, which is particularly helpful when attaching the bunny’s long, iconic ears.
Finally, the chain stitch (ch) is the unsung hero that creates the loops for your drawstring or the foundation for the bunny’s ears. In a Crochet Bunny Pouch, the ears are often started with a long chain and then worked around both sides to create an elongated oval shape. Understanding how to work into the “foundation chain” is key to making the ears look identical and well-proportioned according to the Pattern.
Once the main body of your Crochet Bunny Pouch is complete, it is time to focus on the details that give it character. The ears are the most defining feature of any bunny-themed Pattern. You will typically crochet two identical long ovals and sew them firmly to the top of the pouch. Placement is key; keeping them close together creates a classic look, while spacing them further apart can give your bunny a floppier, more whimsical vibe.
Attaching pieces to a Crochet Bunny Pouch requires a technique called “whipstitching” or “ladder stitching.” You want the connection to be invisible but incredibly strong, especially if the pouch will be opened and closed frequently. Following the Pattern instructions for placement ensures that your bunny doesn’t end up looking lopsided, though a little asymmetry can sometimes add to the handmade charm.
The face of your Crochet Bunny Pouch is where the real magic happens. Using a small amount of pink yarn, you can embroider a simple “Y” shape for the nose and mouth. This is a standard element in many amigurumi-style Pattern designs because it is simple yet effectively communicates the “bunny” aesthetic. Keeping the stitches neat and even is the secret to a professional-looking finished product.
Adding a tail to your Crochet Bunny Pouch is an optional but highly recommended step. A small pom-pom or a tiny crocheted sphere attached to the back of the pouch adds a 3D element that is both adorable and tactile. If you are following a traditional Pattern, it will likely specify the exact round where the tail should be attached to ensure it sits perfectly and doesn’t interfere with the pouch’s ability to stand.
Don’t forget the drawstring closure for your Crochet Bunny Pouch. You can weave a simple chain through the final round of stitches to create a functional opening. Some Pattern enthusiasts prefer to add small wooden beads to the ends of the drawstring to make it easier to grip and to add a rustic, finished look to the entire accessory.
Final blocking is a step often skipped but very beneficial for your Crochet Bunny Pouch. By lightly steaming the ears or the body, you can encourage the yarn to “settle” into its final shape. This ensures that the Pattern you worked so hard on looks its absolute best. Just be careful not to melt synthetic fibers—a light mist of water and some finger-shaping is usually all you need.
One of the best things about the Crochet Bunny Pouch is how easy it is to customize. You can change the size of your Pattern simply by swapping your yarn and hook size. If you want a tiny coin purse, use embroidery floss and a 1.0mm hook; if you want a large toy bag, use chunky “blanket” yarn and an 8.0mm hook. The proportions will stay the same, but the utility will change completely.
Colorwork can transform a basic Crochet Bunny Pouch into something truly unique. You can try “self-striping” yarn for a colorful look or use “tapestry crochet” techniques to add a name or a heart directly into the Pattern. Experimenting with different colors for the inside of the ears—perhaps a soft pink or a floral print fabric—can also add a professional and personalized touch to your work.
Texture is another way to elevate your Crochet Bunny Pouch. Instead of standard single crochet, you could try using the “waistcoat stitch” for a knit-look finish or the “bobble stitch” to create a fuzzy, sheep-like texture for the bunny’s fur. Most Pattern designs can be adapted to these stitches as long as you maintain the same number of increases and decreases.
Consider the “personality” of your Crochet Bunny Pouch by adjusting the ear length. Super long, floppy ears make for a very cute “lop” bunny, while short, upright ears look more like a wild hare. This simple modification to the Pattern allows you to create a whole family of different bunnies using the same basic instructions for the pouch body.
Adding a strap can turn your Crochet Bunny Pouch into a small crossbody bag for kids. A simple strap made of several rows of single crochet or a sturdy “i-cord” can be attached to the sides. This modification is rarely in the basic Pattern, but it is a highly functional addition that makes the pouch much more practical for outdoor adventures or egg hunts.
Finally, think about seasonal variations for your Crochet Bunny Pouch. While bunnies are a staple of Spring and Easter, you can use darker colors and “spooky” embellishments to create a Gothic bunny for Halloween, or use sparkly white yarn for a Winter wonderland version. The Pattern is a canvas for your creativity, and there are no limits to how you can adapt it to your personal style.
1. Is this Crochet Bunny Pouch Pattern suitable for absolute beginners?
Yes! If you know how to do a single crochet, increase, and decrease, you can definitely tackle this project. It is a great way to practice working in the round and basic assembly.
2. How long does it take to finish a Crochet Bunny Pouch?
Depending on your speed, most people can finish a standard-sized pouch in about 2 to 4 hours. It is the perfect weekend project or a quick evening craft.
3. What is the best yarn for a Crochet Bunny Pouch?
Cotton or a cotton-blend yarn is usually preferred because it doesn’t pill as much as acrylic and offers great stitch definition, making the bunny features pop.
4. Can I wash my Crochet Bunny Pouch?
Yes, especially if you use cotton or acrylic yarn. I recommend hand washing in cool water and laying it flat to dry to ensure the shape and the ears stay in perfect condition.
5. How do I make the ears stay upright?
If you want very stiff ears, you can use a smaller hook to create a tighter fabric, or you can insert a bit of plastic mesh or starch the ears once you are finished with the Pattern.
6. Can I sell items made from this Crochet Bunny Pouch Pattern?
Most designers allow you to sell finished items as long as you give credit to the pattern creator. Always check the specific terms of the pattern you are following.
In this article, we have explored the wonderful world of the Crochet Bunny Pouch, covering everything from the essential materials and foundation stitches to assembly and creative customization.
This Pattern is more than just a set of instructions; it is a gateway to creating something filled with personality and love. We hope this guide inspires you to pick up your hook and start crafting your own long-eared companion.


